Analytics

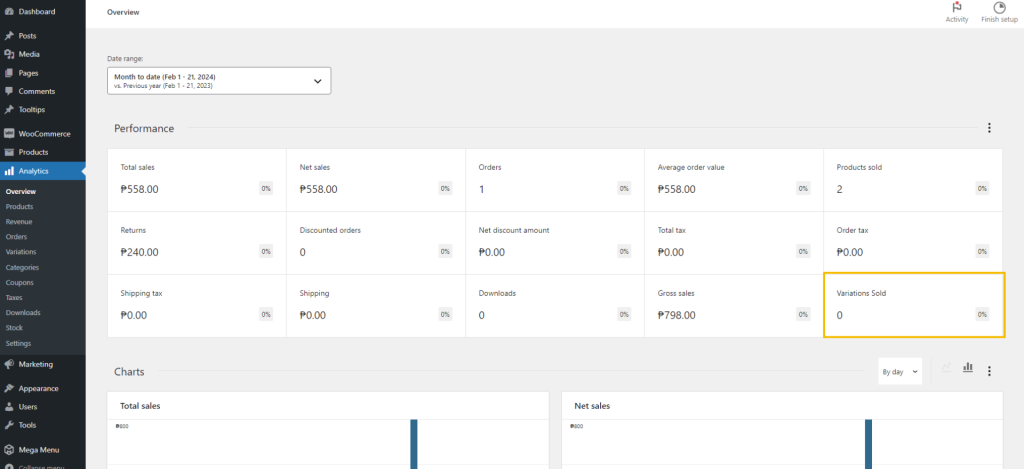
This section is your quick guide for analytics to understand how your product is performing. It shows total sales, net sales, revenue, and the number of items sold and such.

Read more: Manage User Profile

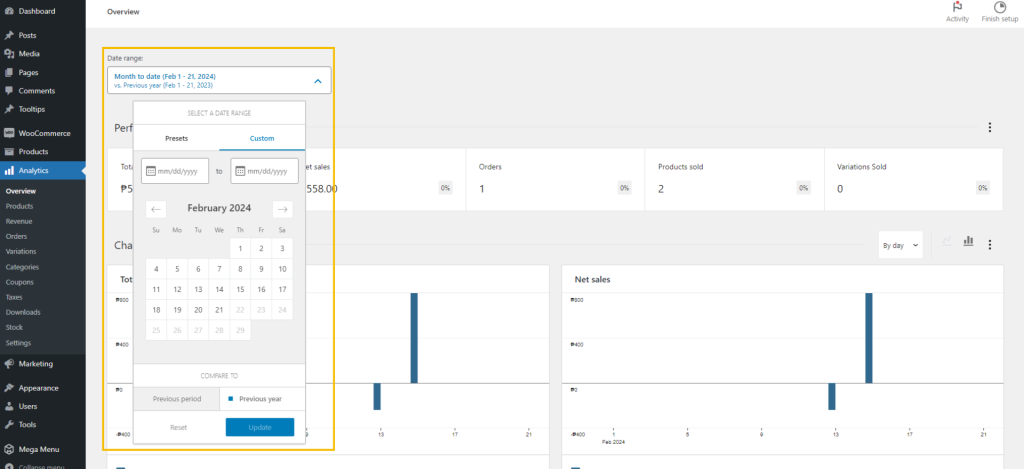
Date Range

A date range in sales allows you to specify a period of time during which you want to analyze or view sales data.

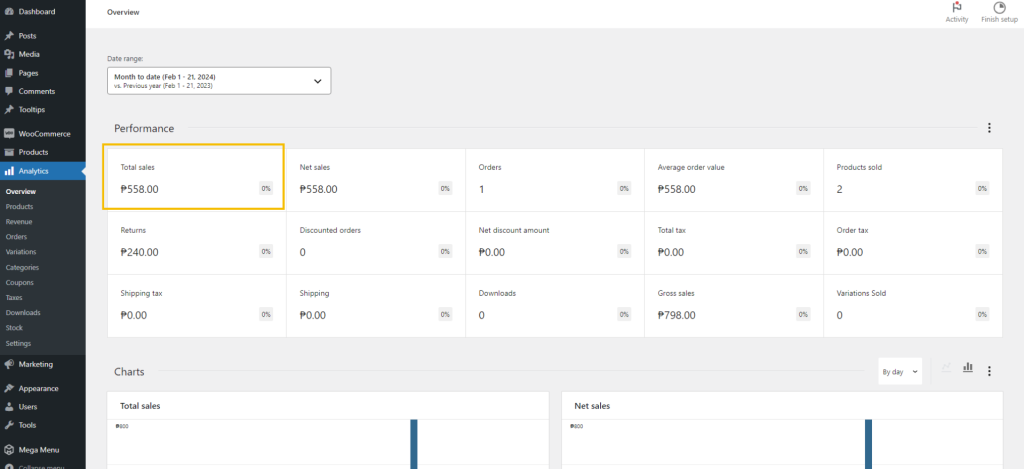
Total Sales

Total sales represent the total revenue earned from selling products during a specific period.

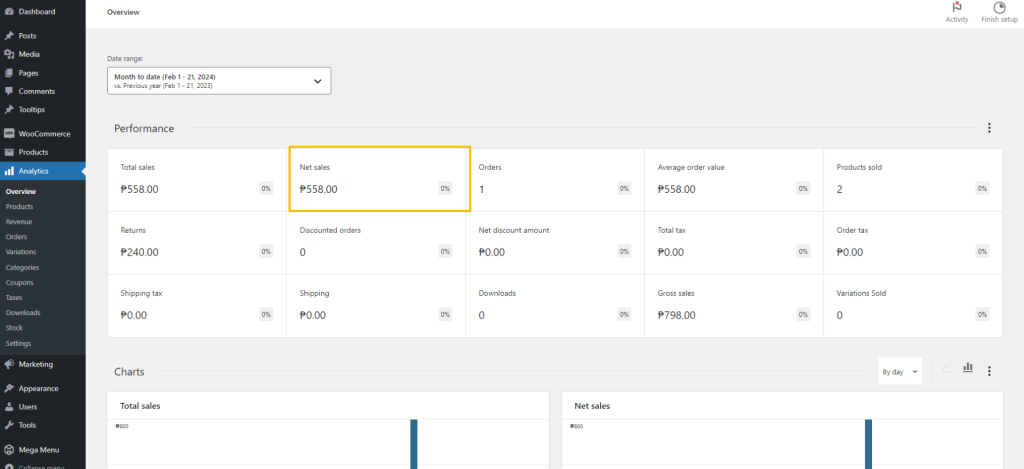
Net Sales

Net sales, which refers to the company’s total revenue minus any deductions such as returns, discounts, and allowances.

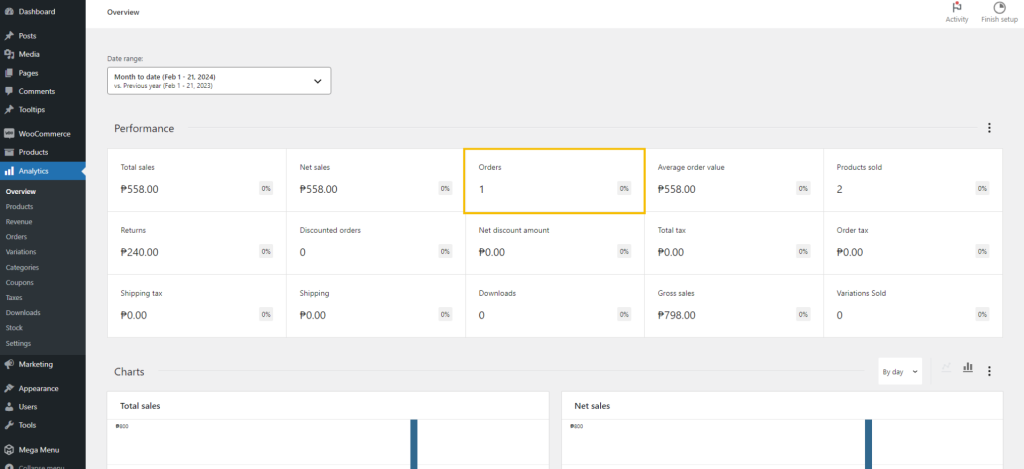
Orders

In the Order section, you will see all of the products you have purchased, as well as their order status.

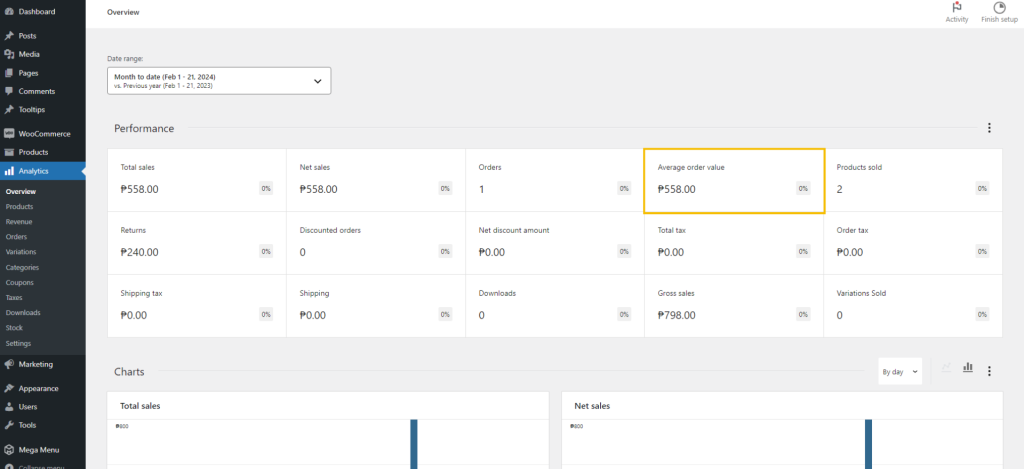
Average Order Value

Average Order Value measures the average amount spent by customers when they place an order on a website. It should be tracked as closely as any other company metric, preferably every day or week.

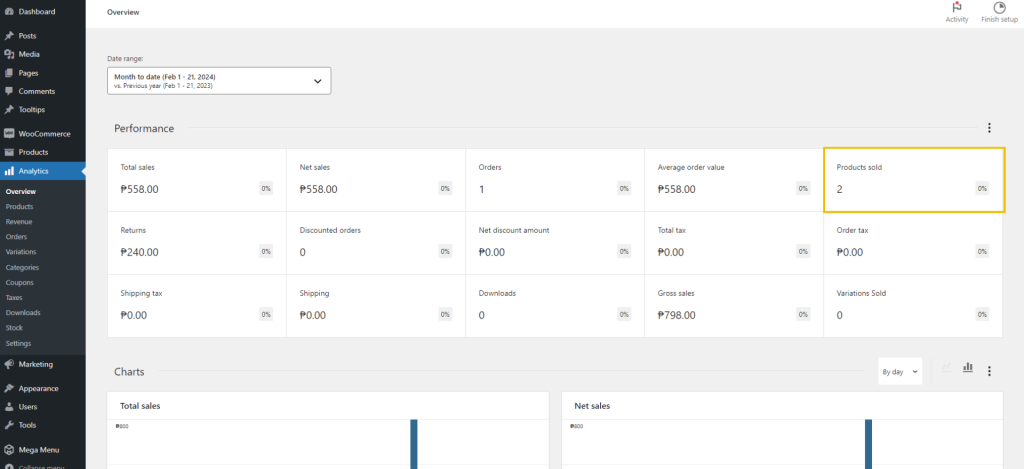
Products Sold

Products Sold refers to items that have been completed or delivered to customers.

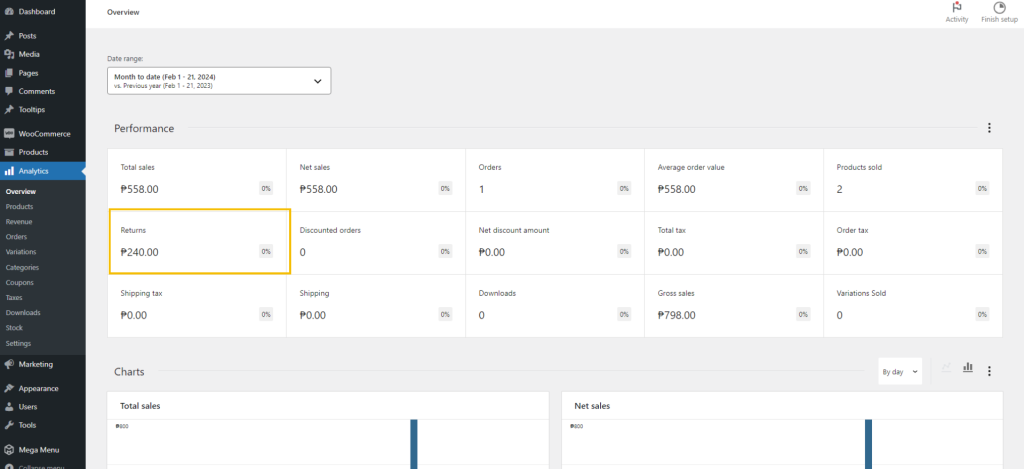
Returns

Returns are transactions in which a buyer of inventory or other products sends these goods back to the supplier.

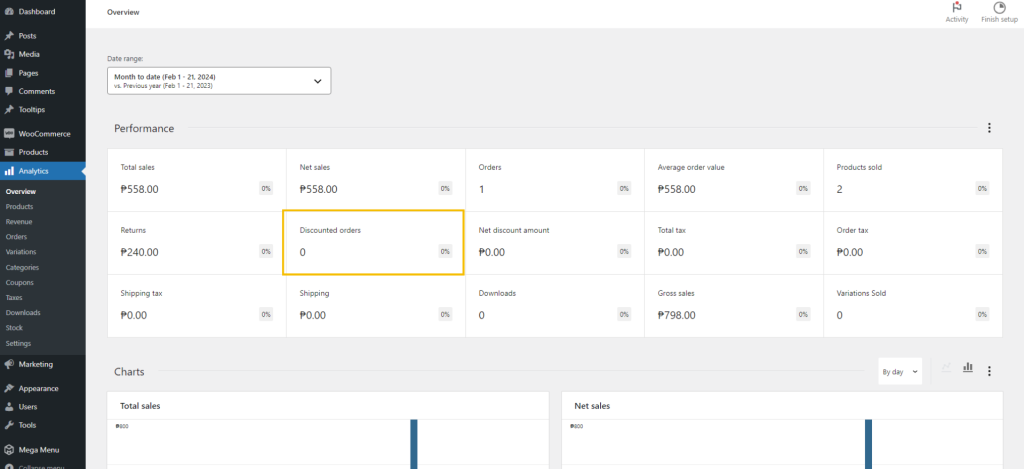
Discounted Orders

Discounted orders reduce the original price of a product or service, letting buyers to pay less than the standard price.

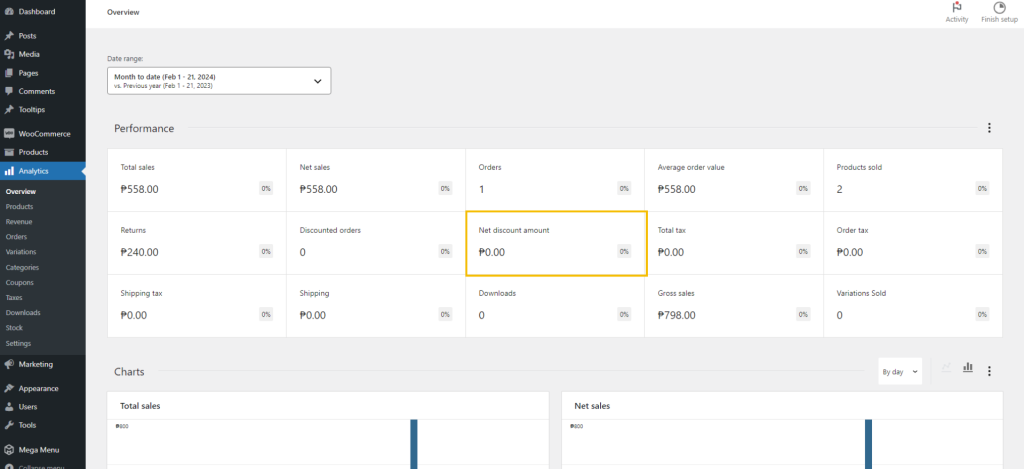
Net Discount Amount

Net Discounted Amount is the amount that remains after every qualified discounts have been deducted from the original price.

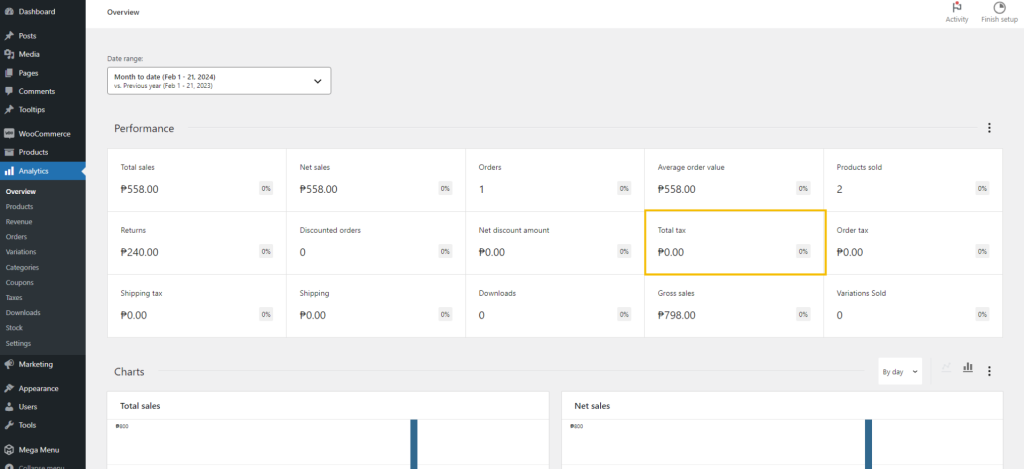
Total Tax

Total tax refers to the sum of all taxes owing by a taxpayer for the year.

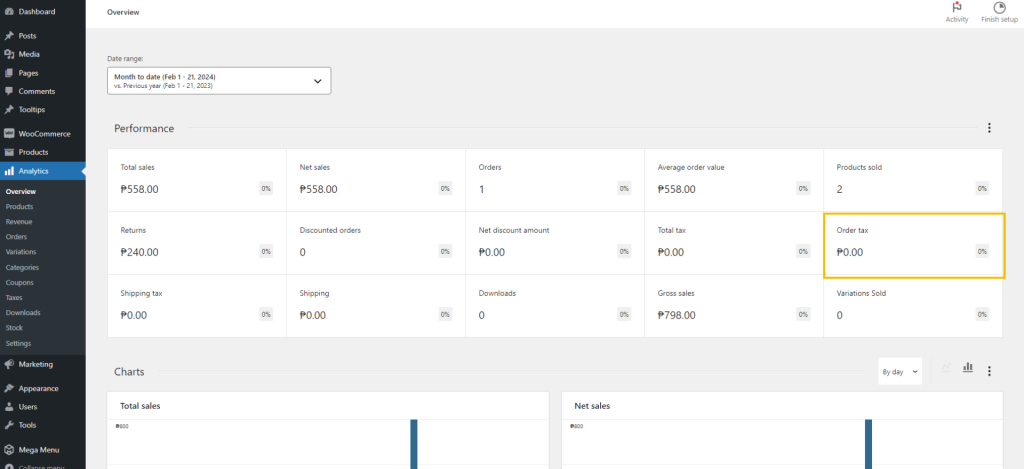
Order Tax

Order Tax refers to the order in which various taxes are paid or allocated within a company’s financial activities.

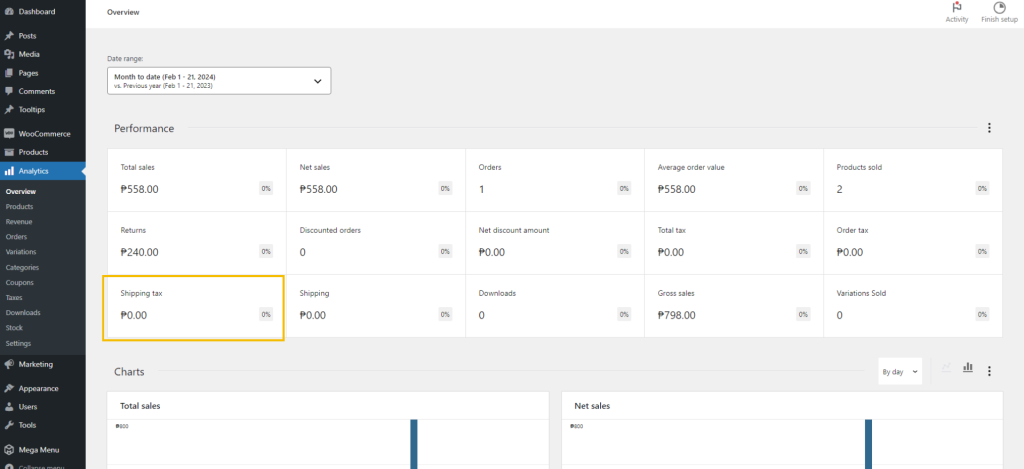
Shipping Tax

Shipping Tax is charged on the cost of transportation rather than the cost of the products themselves.

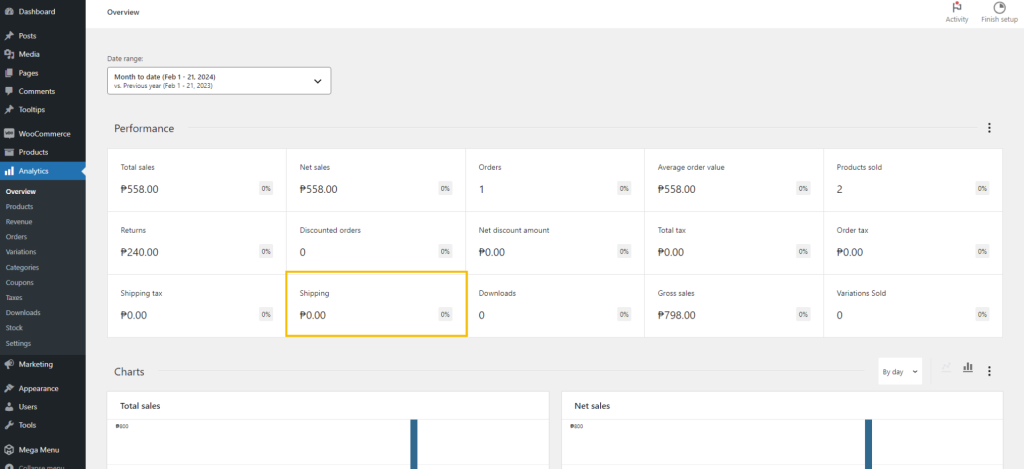
Shipping

Shipping refers to the physical movement of the product you purchased or ordered from one location to another.

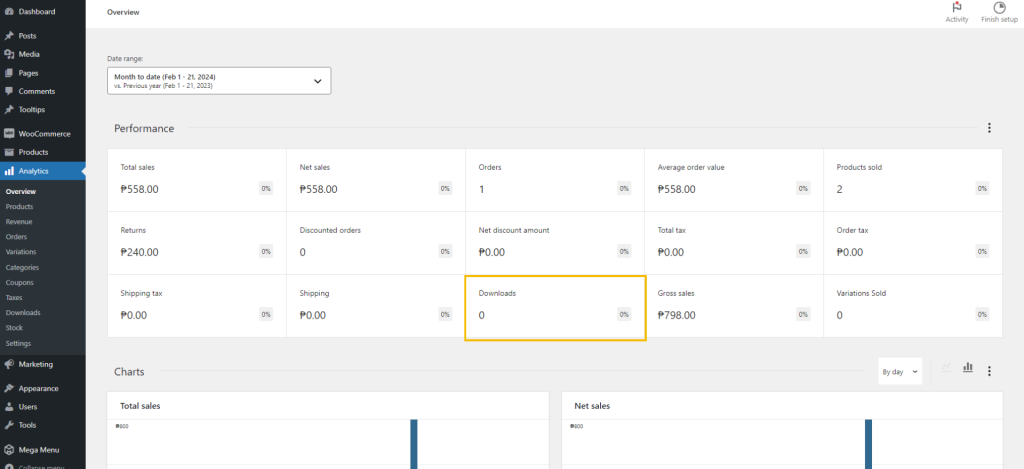
Downloads

Downloads is for customers who want to download product photos.

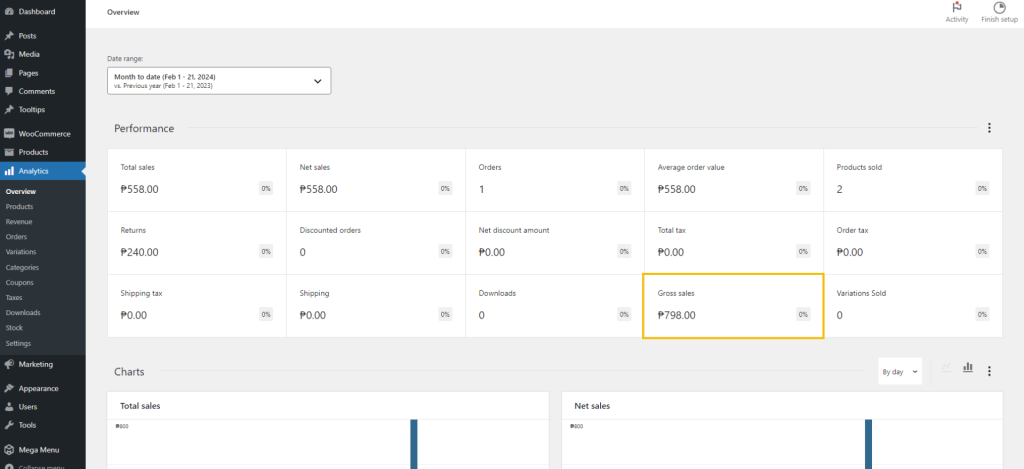
Gross Sales

Gross Sales are the total money generated by a business from the sale of products or services, before any deductions are made.

Variation Sold

Variation Sold refers to the several variants of a product that have been sold or purchased in response to a customer’s wants.

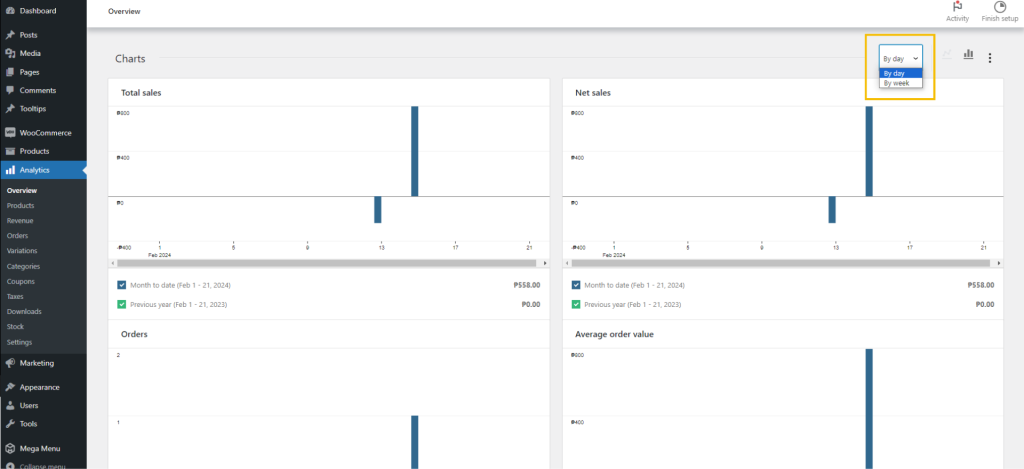
Charts

In the Chart section, you can choose whether you want to track sales or orders by week or month, and you will see all of them in a chart based.

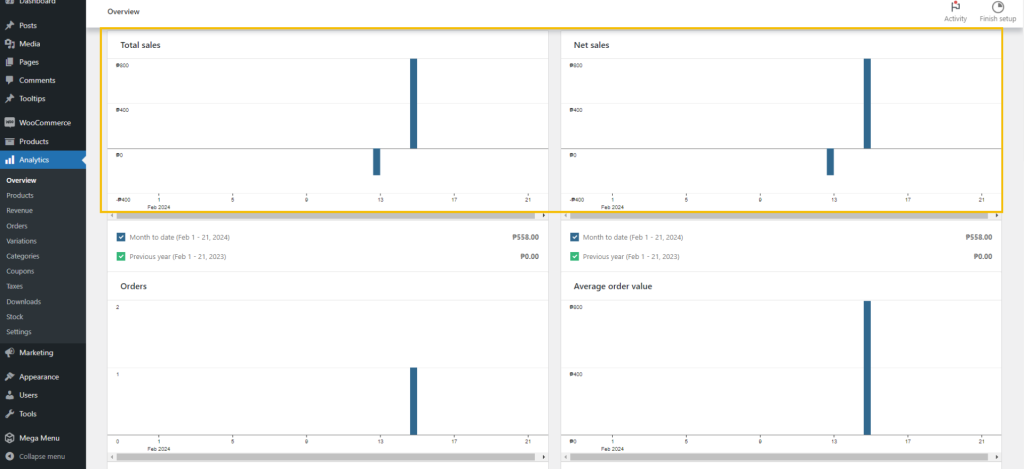
These are some example charts of total and net sales for the month. They track sales based on the quantity received and record it in a chart format.

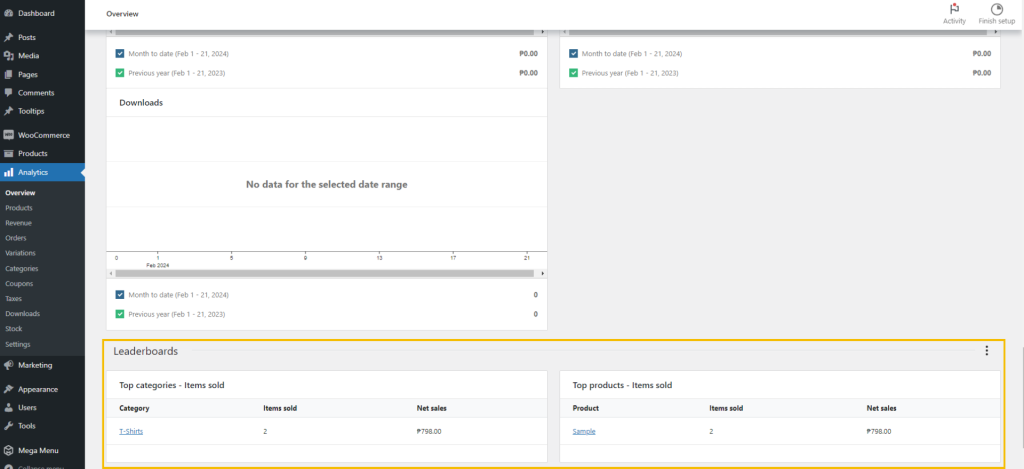
Leaderboard

The Leaderboard section displays the top categories or products that have been sold or purchased the most.

Read More

Product Shipping Classes

Improve shipping! Add a class for accurate rates and smooth deliveries. Customize options for your products easily.

Read more: Manage User Profile

Adding a shipping class

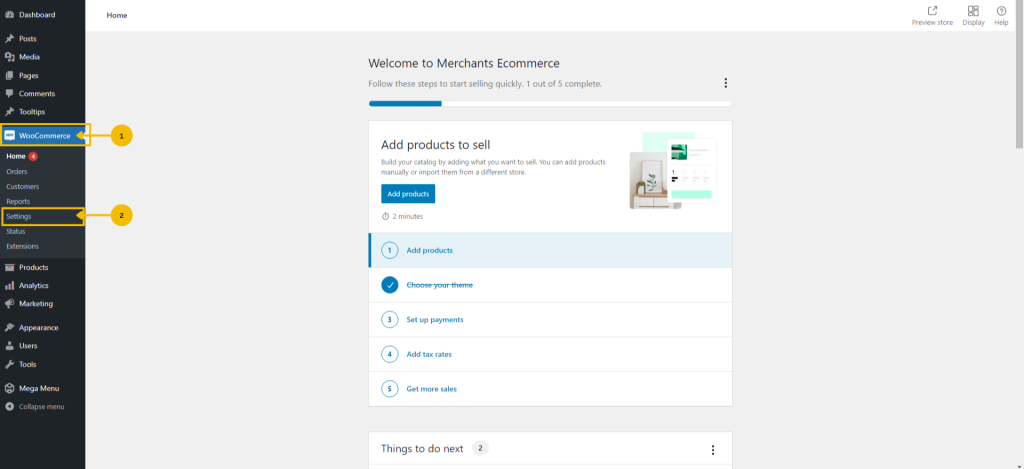
1. Navigate to the menu bar and select ‘WooCommerce’.
2. Then, within the WooCommerce menu, click on ‘Settings’.

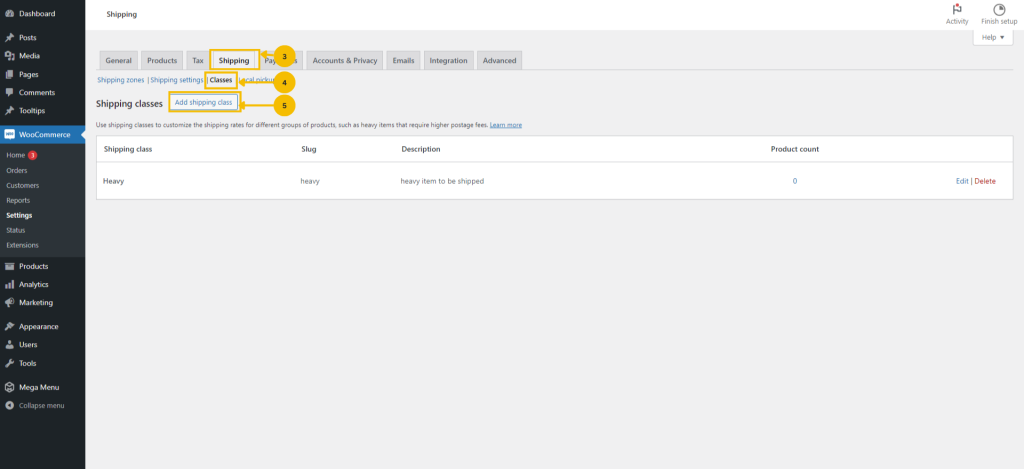
3. Go to the ‘Shipping’ section.
4. Once you have clicked the shipping section, click the ‘Classes’.
5. Click ‘Add shipping class’.

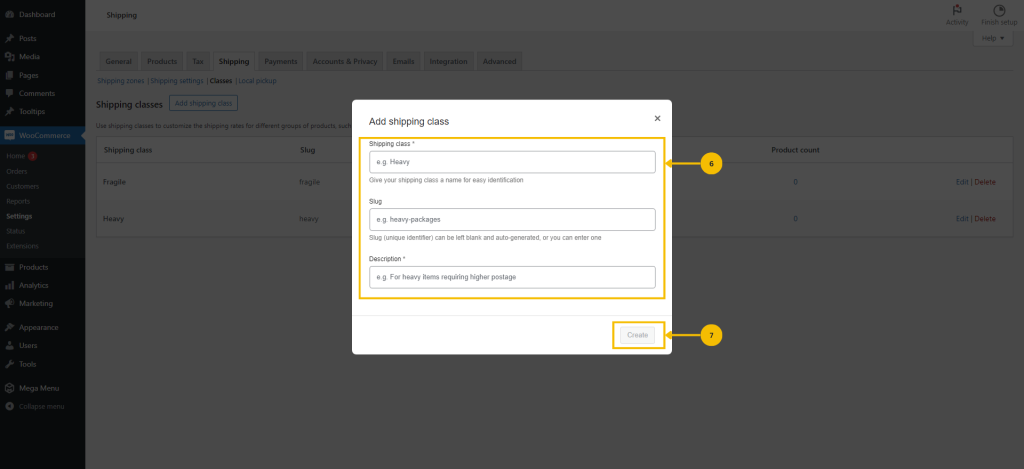
6. Provide the required information to add a shipping class.
7. After filling in the necessary details, click the ‘Create’ button.

Read More

Manage Customer’s Order

Manage your orders effortlessly! With a few clicks, you can seamlessly shift between order statuses (Pending, Processing, and Completed). Send quick email invoices to keep customers updated at all times.

Read more: Manage User Profile

Process customer orders

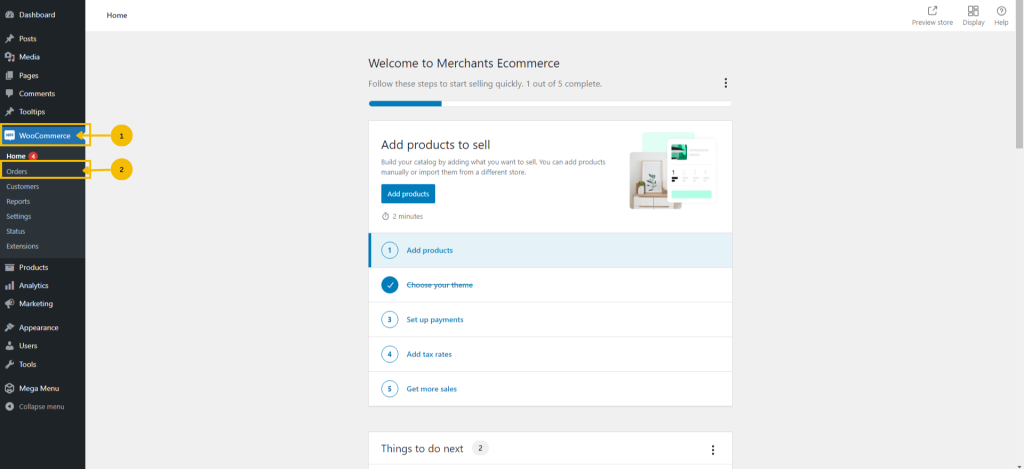
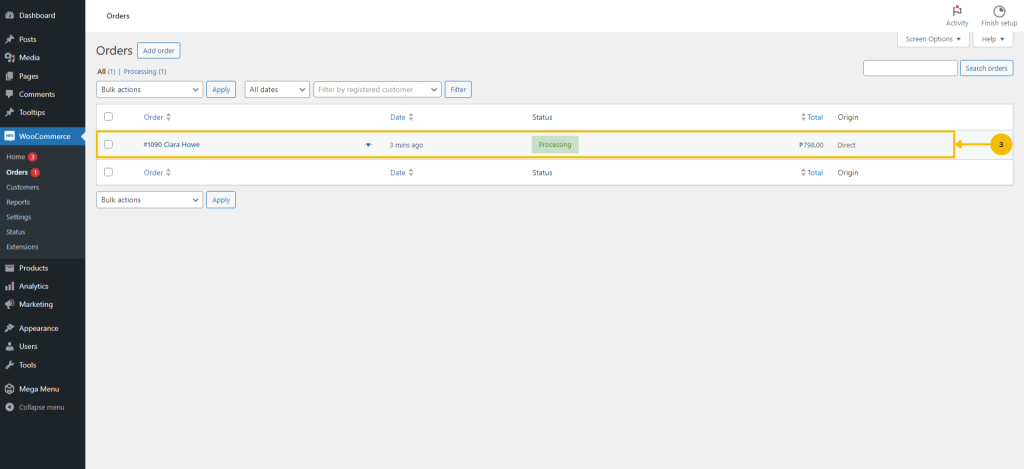
1. Navigate to the menu bar and select ‘WooCommerce’.
2. Then, within the WooCommerce menu, click on ‘Orders’.

3. Click on the specific order section and you will be redirected to another page where you can proceed with order processing. To preview the order, click this ‘👁’ button.

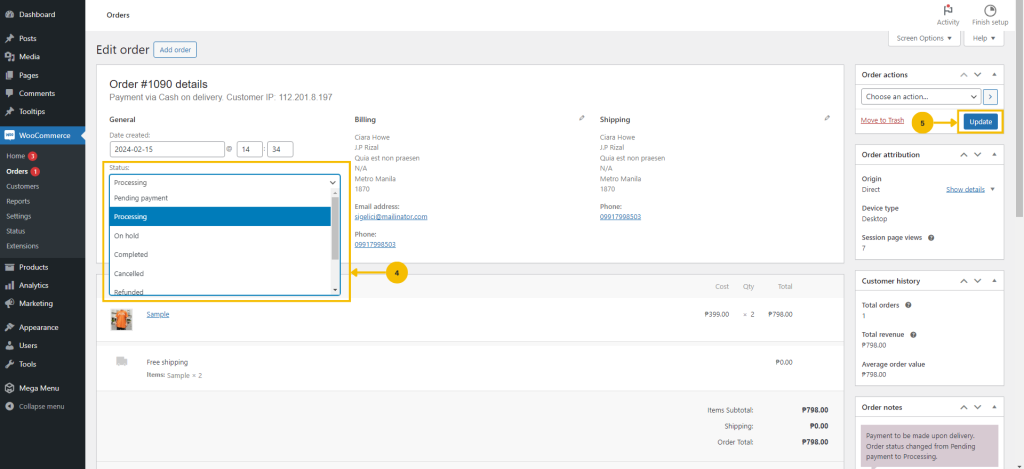
4. Select the ‘Status’ drop-down menu and choose from the available options to set the status of the orders.
5. Click on the ‘Update’ to inform the customer about the status of their orders.

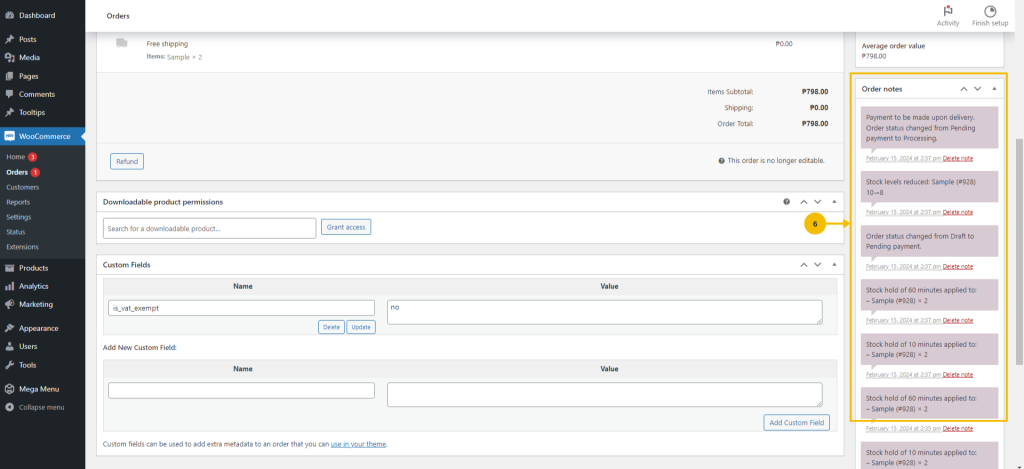
Order Notes

The Order Notes panel displays notes attached to the order and can be used for storing event details, such as payment results or reducing stock levels, or adding notes to the order for customers to view.

6. The ‘Order notes’ section provides updates on the customer’s orders, and it can also be a record of activities.

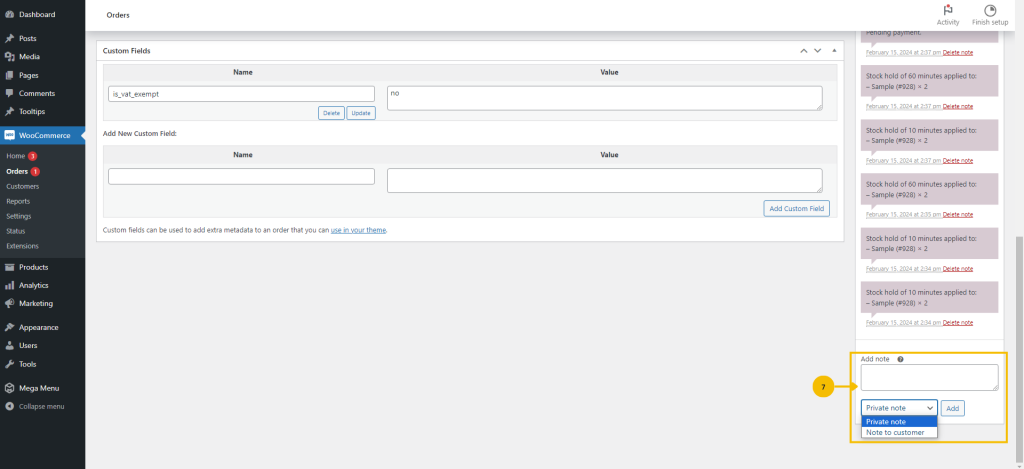
7. To leave a note for your customer, simply type in the provided box, choose from the drop-down menu, and then click the ‘Add’ button.

Email Invoice/Order Details

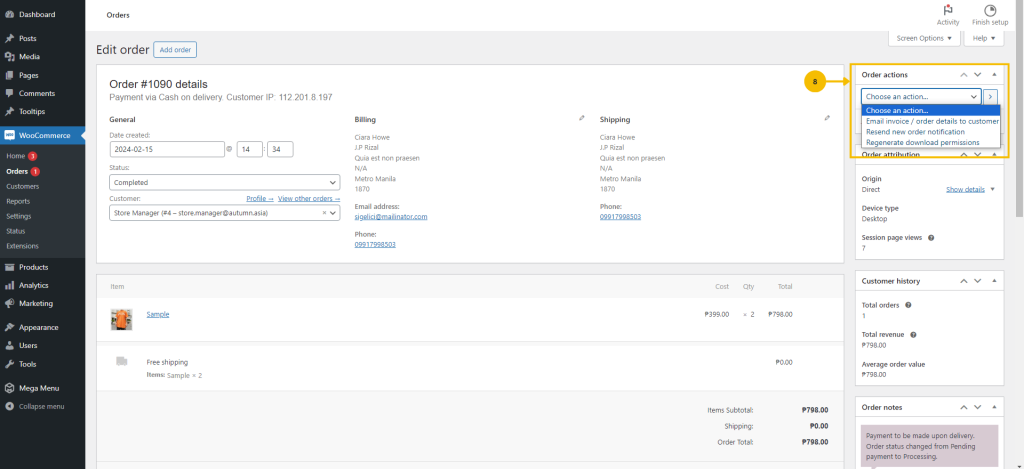
8. To send the invoice of the orders to the customer via email, click the drop-down and select ‘Email invoice/order details’.

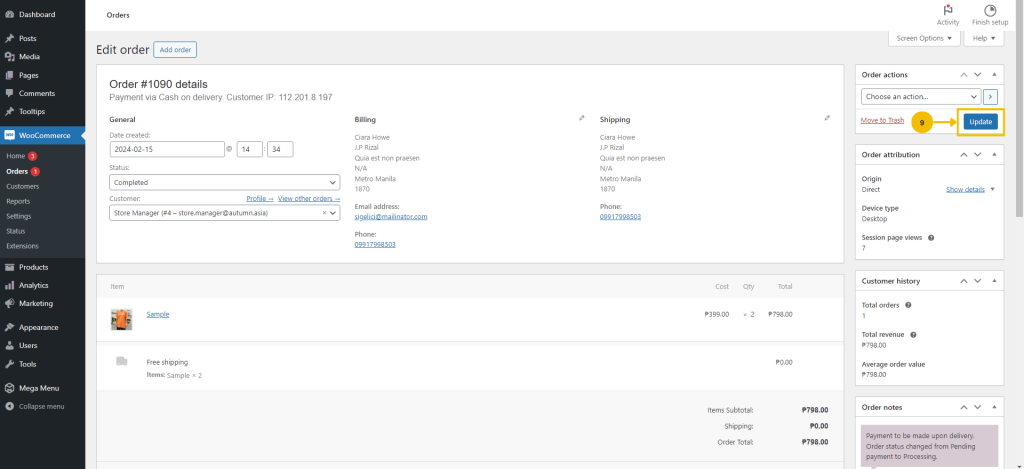
9. Click ‘Update’ to be able to send it to the customer’s registered email.

Read More

Set up your Payment Method

Enable seamless transactions for your customers with options like direct bank transfers and check payments. Enhance flexibility with cash on delivery, ensuring clear communication of any additional fees or terms.

Read more: Manage User Profile

Add different payment method

1. Navigate to the menu bar and select ‘WooCommerce’.
2. Then, within the WooCommerce menu, click on ‘Settings’.

Direct Bank Transfer

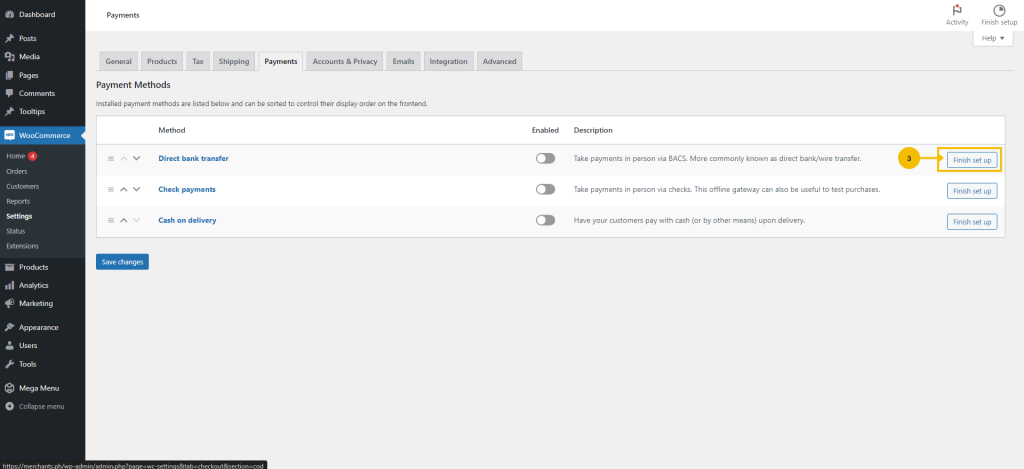
3. Once you’ve selected “Settings” in the navigation area, go to the payment section, and then proceed to click on the ‘Finish setup’.

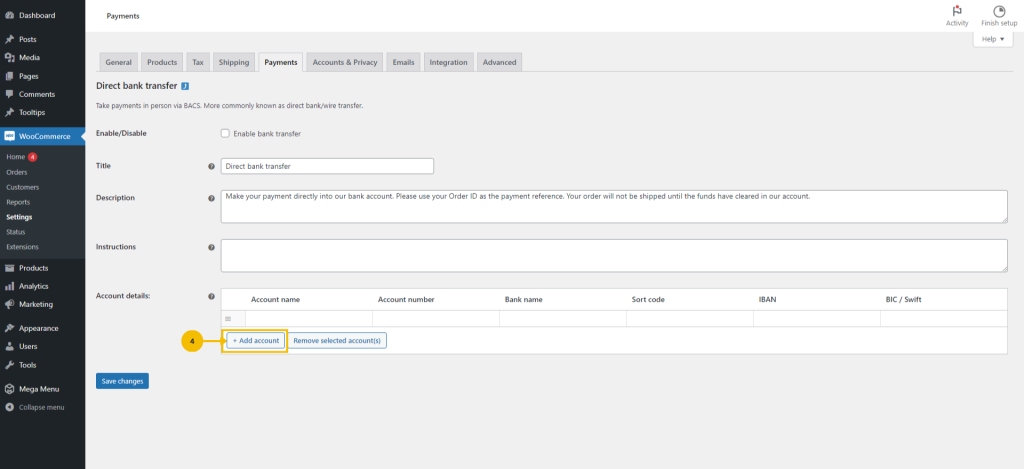
4. To set up a direct bank transfer as your payment option, click ‘Add account’ and fill in the required details of your bank account.

Check Payments

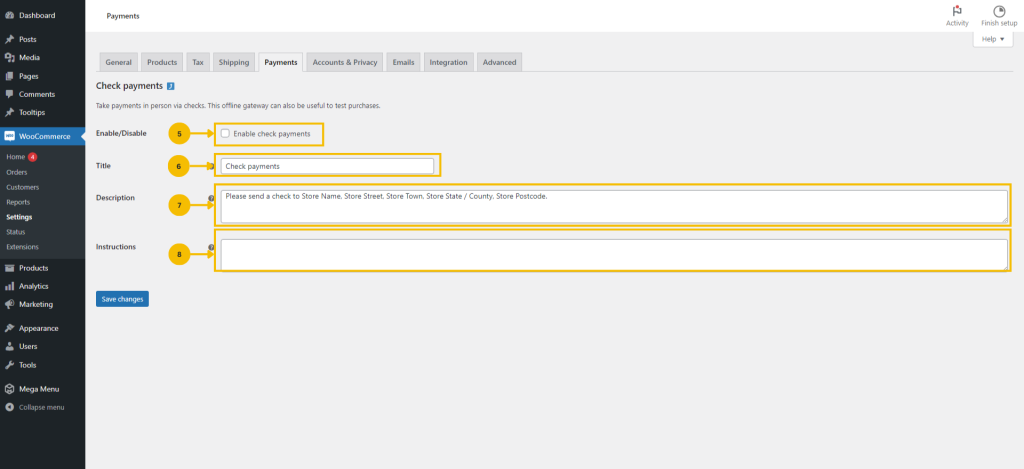
5. Click the box next to “Enable check payments” to enable check payments as your payment option.
6. You can input a new title if you want to change the name of that payment method.
7. Write a short description about the check payment method.
8. To provide instructions for check payments, you can enter the details in the provided box.

Cash on Delivery

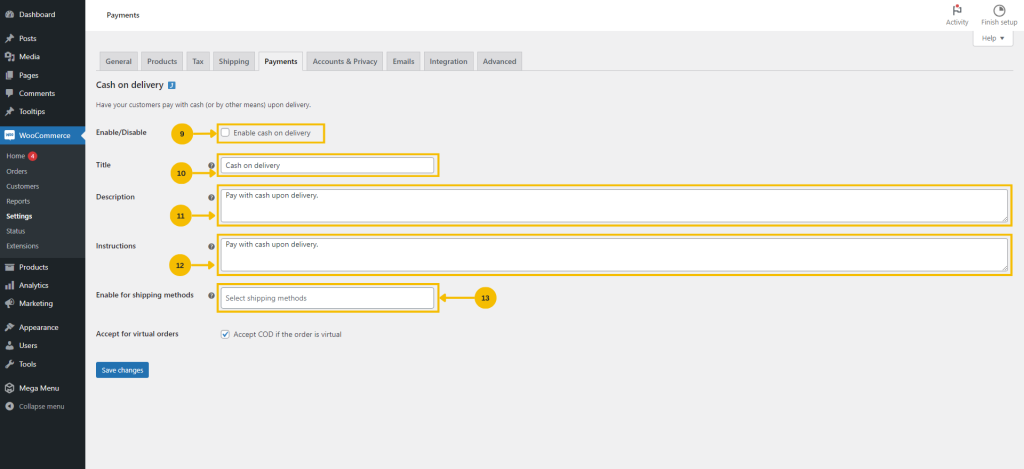
9. Click the box next to “Enable cash on delivery” to enable cash on delivery as your payment option.
10. If you wish to modify the name of the payment method, you can enter a new title.
11. Create a brief description for the cash on delivery payment method.
12. To provide instructions for cash on delivery, you can enter the details in the provided box.
13. If cash on delivery is only available for certain shipping method, click the drop-down menu and choose from the available options. Leave black to enable for all methods.

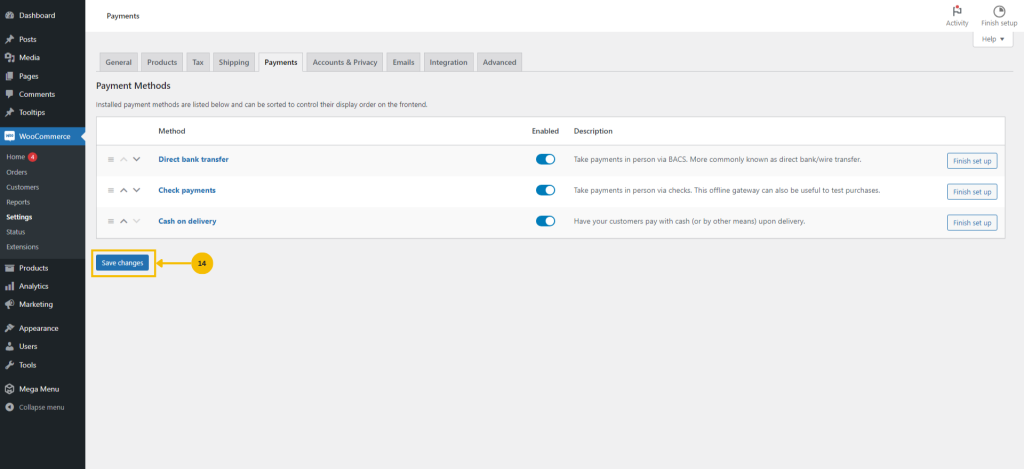
14. After completing the setup of your payment method, click on ‘Save changes’.


Read More

Set up your Shipping Method

Effortlessly set up your shipping method with three options: flat rates for clear costs, free shipping as a bonus for customers, and local pick-up for added convenience. Make your delivery options more personalized for a seamless experience.

Read more: Manage User Profile

Adding a shipping method

1. Navigate to the menu bar and select ‘WooCommerce’.
2. Then, within the WooCommerce menu, click on ‘Settings’.

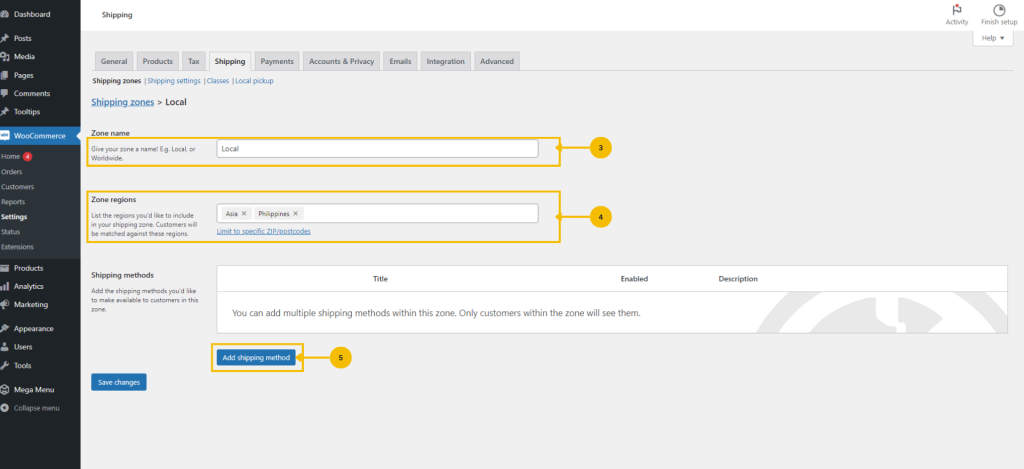
3. Enter the zone name for your shipping zone.
4. Enter the zone regions.
5. Click the ‘Add shipping method’.

For free shipping method

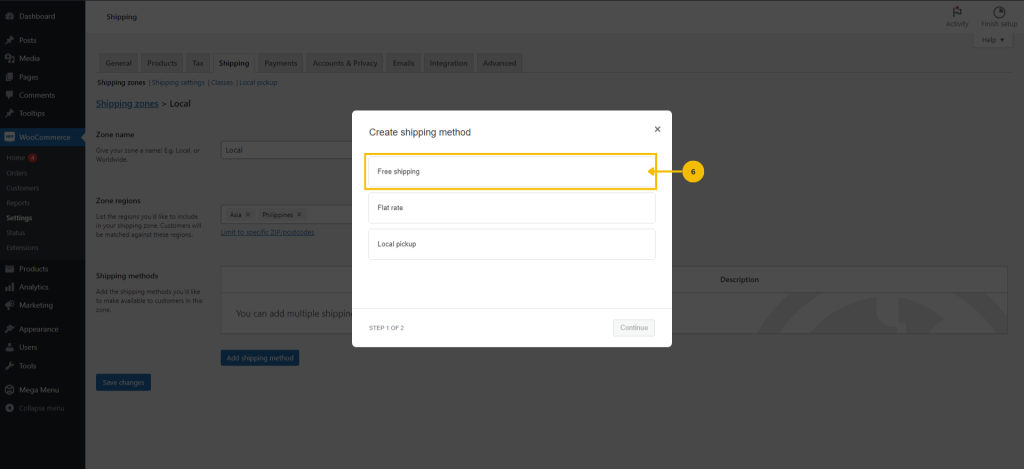
6. Click the ‘Free Shipping’ method.

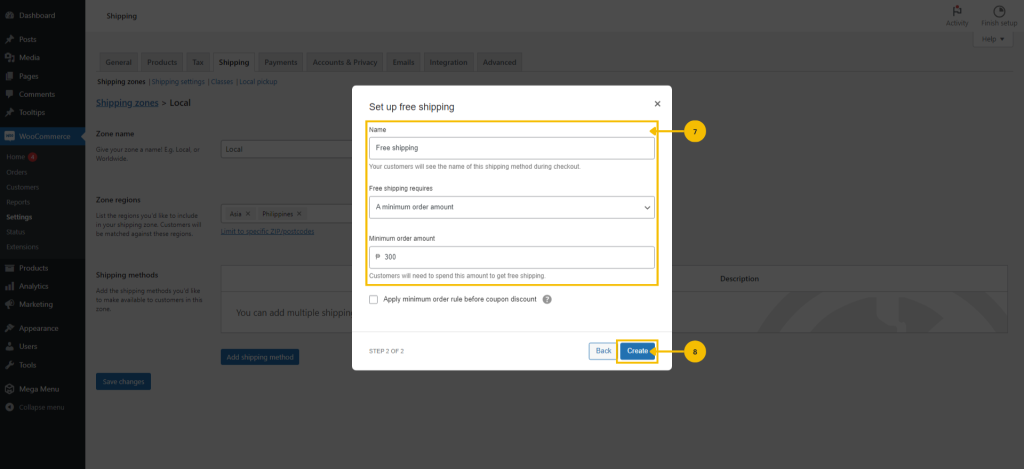
7. Set up your free shipping method by completing the necessary details.
8. Click the ‘Create’ button.

For flat rate shipping method

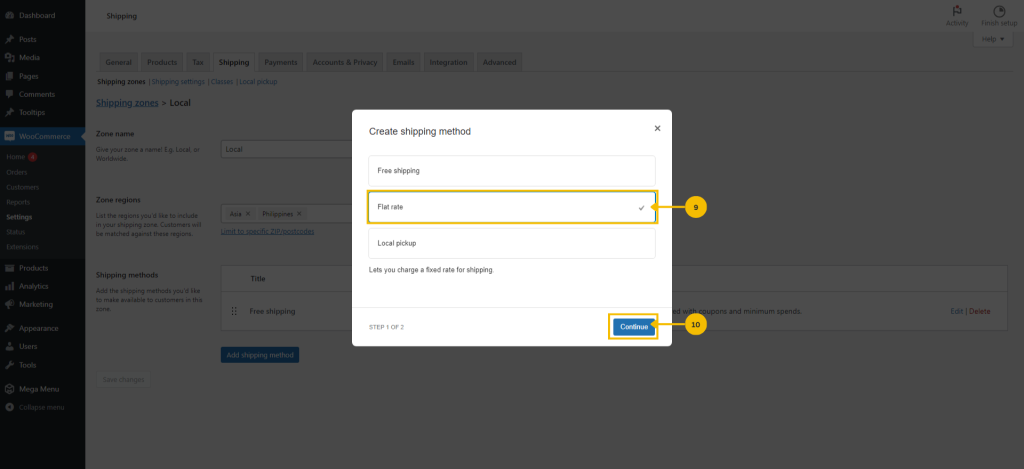
9. Choose the ‘Flat rate’ shipping method.
10. Click the ‘Continue’ button.

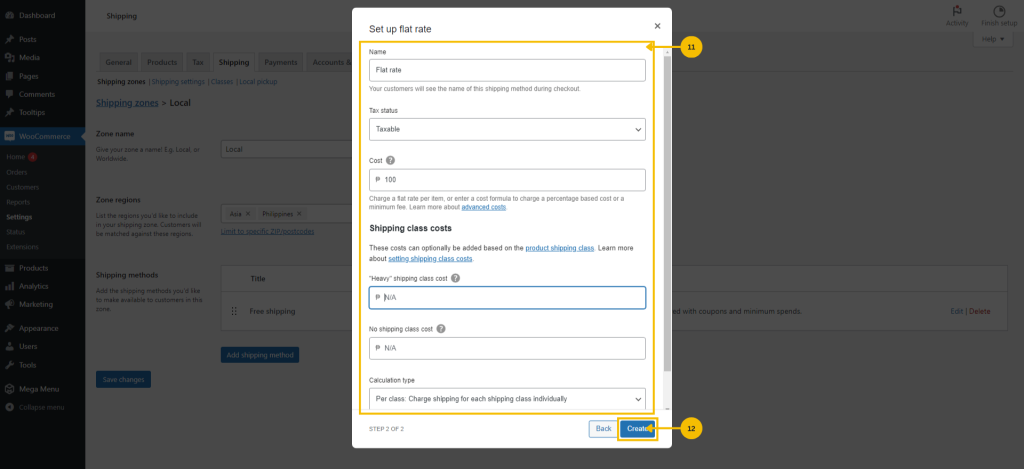
11. Fill in all the necessary details for your flat rate method, and you can easily set shipping class costs by entering the corresponding amount.
12. Click ‘Create’ button.

For local pick-up shipping method

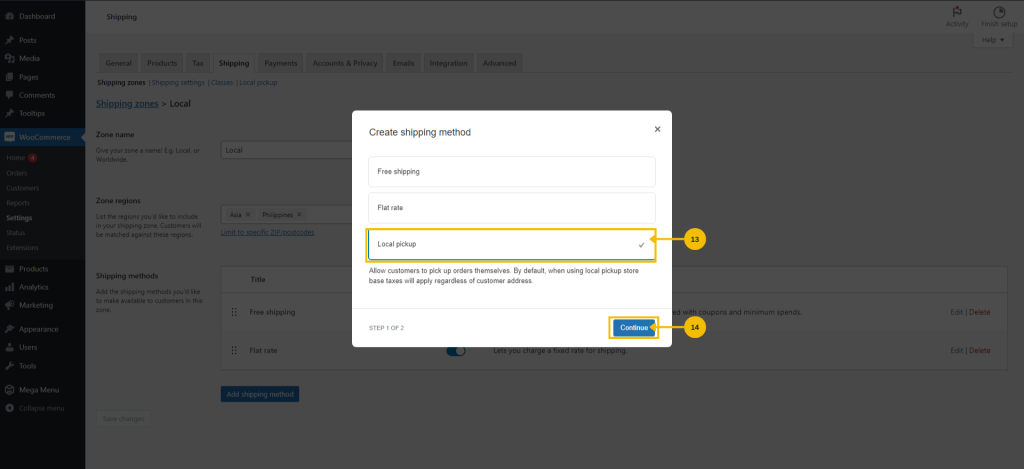
13. Click the ‘Local pickup’ shipping method.
14. Click the ‘Continue’ button.

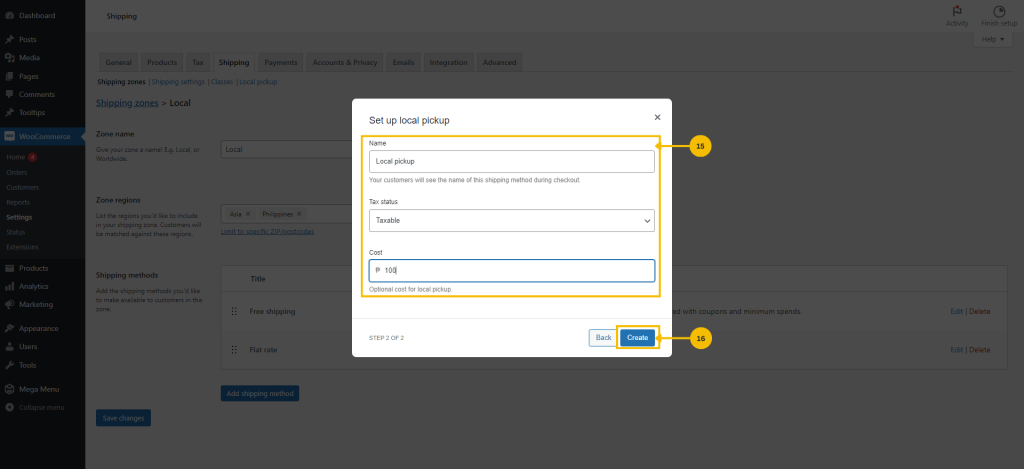
15. Provide all required details for local pickup, including selecting ‘Tax Status’ options and specifying a ‘Cost’ for local pickup if needed.
16. Click the ‘Create’ button.

Read More

Manage Store Address

Help customers find you. Share your address to be seen, attract more customers, and connect with the community.

Read more: Manage User Profile

Add your store address to your online shop/website.

1. Navigate to the menu bar and select ‘WooCommerce’.
2. Then, within the WooCommerce menu, click on ‘Settings’.

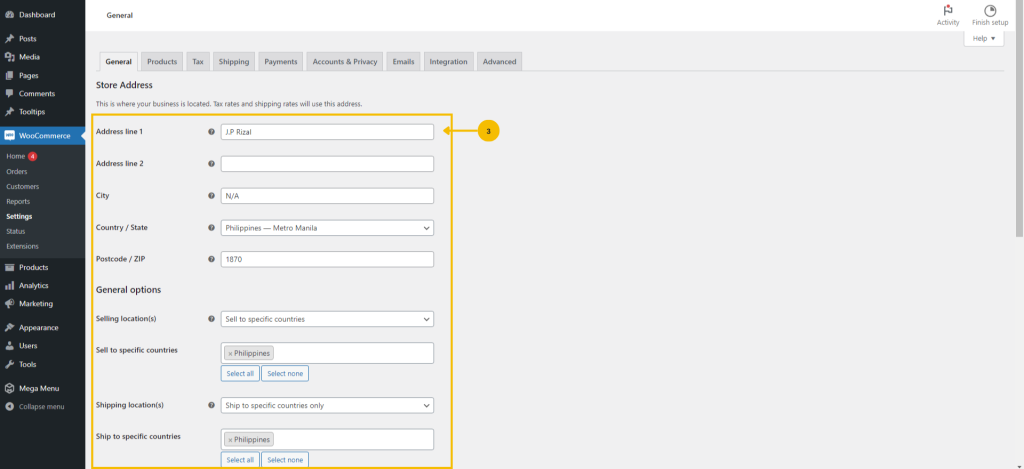
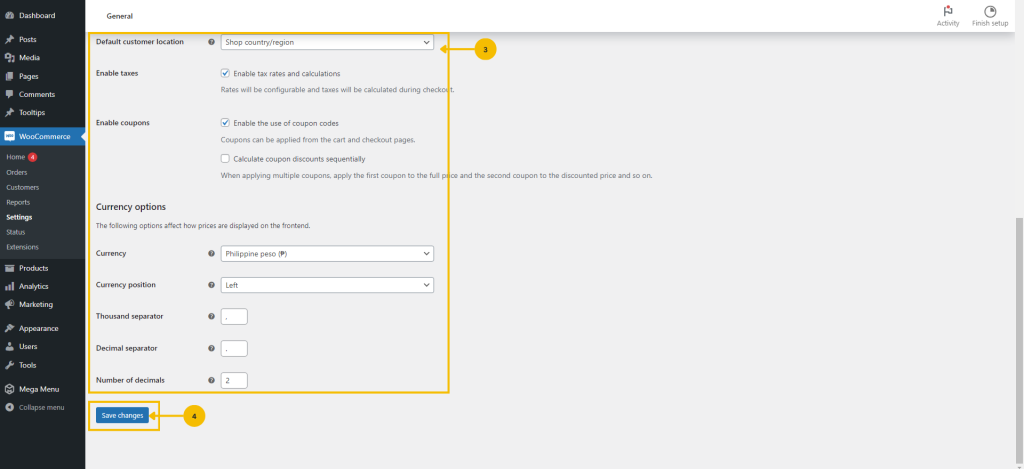
3. In the ‘general section’, complete all necessary details about your store address.
4. After you’ve filled in the needed details, click ‘Save Changes’.

Read More

Setting up your Affiliate/External Product

Step up your online store by adding affiliate/external products, giving customers more choices. These products link to other sites, expanding options beyond your store.

Read more: Manage User Profile

Before you begin

To set up your variable product, you must be:
• Store Manager of your online shop.
• Log in to your website with your store manager credentials.

Add an affiliate/external product

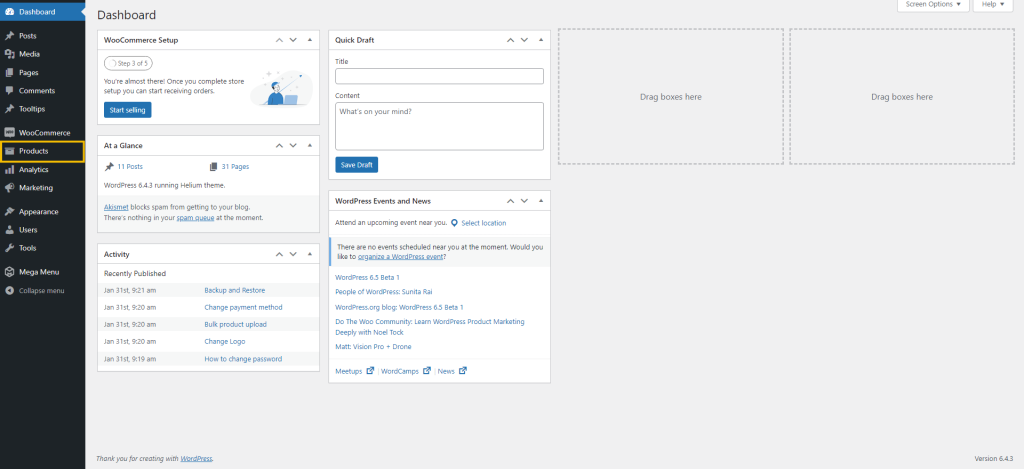
Go to the navigation bar, then click on ‘Products’.

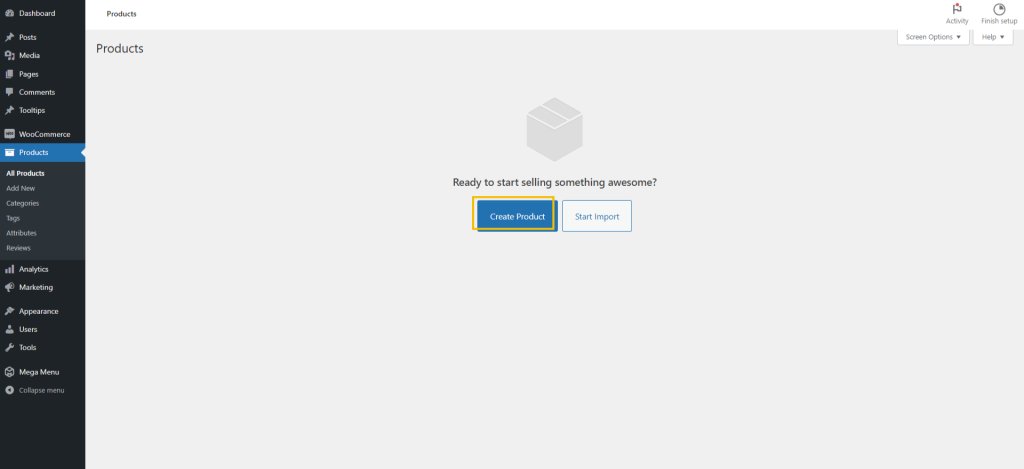
After selecting the products menu, click on ‘Create products’.

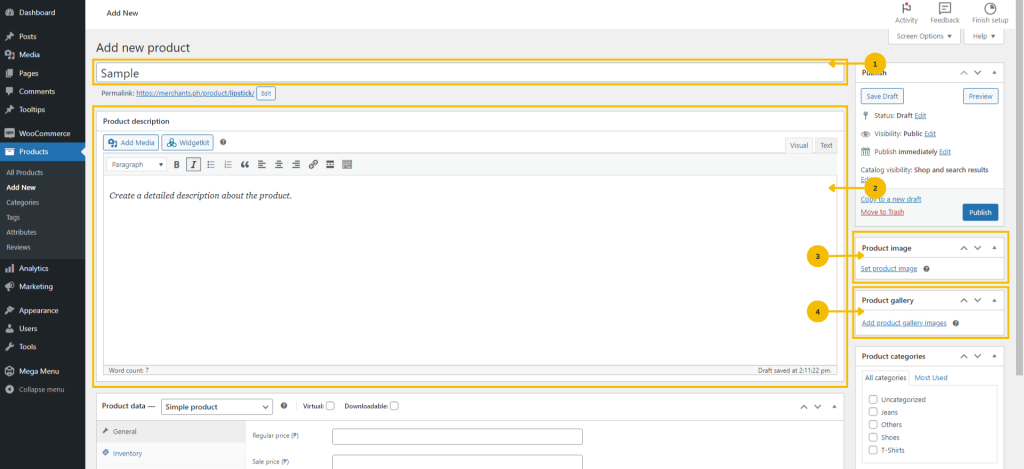
To be able to create a product, follow the steps below:

1. Enter the name of the product you want to sell.
2. Write a detailed description of the product.
3. Select the picture you like to get displayed in your online store.
4. Upload additional photos to the product gallery if you have any.

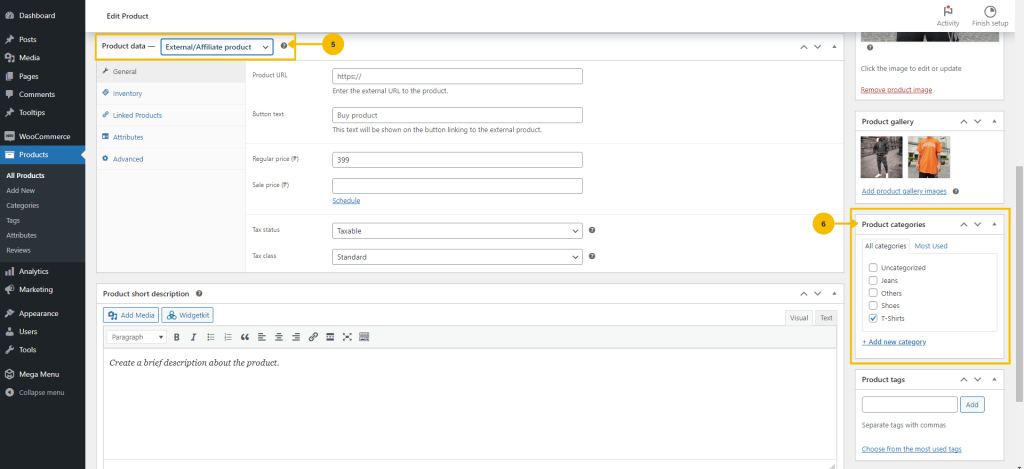
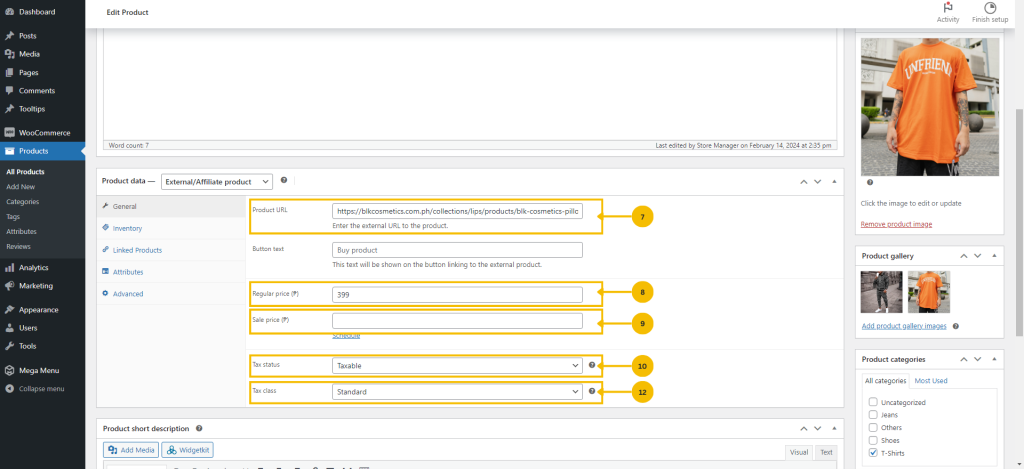
5. Click the drop-down menu and choose ‘External/Affiliate Product’.
6. Choose a category for your products, and if you want to create a new one, click ‘Add new category’.

7. Enter or copy the ‘Product URL’ of your external product.
8. Enter the ‘regular price’ of your external product.
9. To put your external product on sale, simply enter the ‘sale price’ and ‘set the schedule’ for the start and end dates of the sale price of your product.
10. Click on the drop-down button and choose one of the options listed under ‘Tax status’.
11. Click on the drop-down button and select from the available choices under ‘Tax class’.

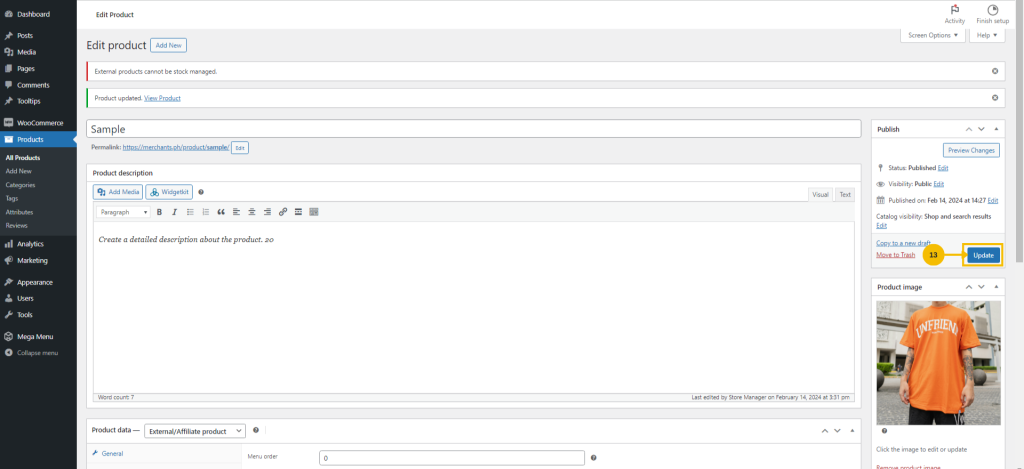
12. Click the ‘Publish‘ button to display your external product on your online store.

Read More

Setting up your Variable Product


Enhance your online store by setting up variable products, allowing customers to pick what suits them best. From different sizes in various colors, it’s easy for them to find exactly what they need. Simple, personalized, and hassle-free shopping.

Read more: Manage User Profile

Before you begin

To set up your variable product, you must be:
• Store Manager of your online shop.
• Log in to your website with your store manager credentials.

Add variable product

Go to the navigation bar, then click on ‘Products’.

After selecting the products menu, click on ‘Create products’.

To be able to create a product, follow the steps below:

1. Enter the name of the product you want to sell.
2. Write a detailed description of the product.
3. Select the picture you like to get displayed in your online store.
4. Upload additional photos to the product gallery if you have any.

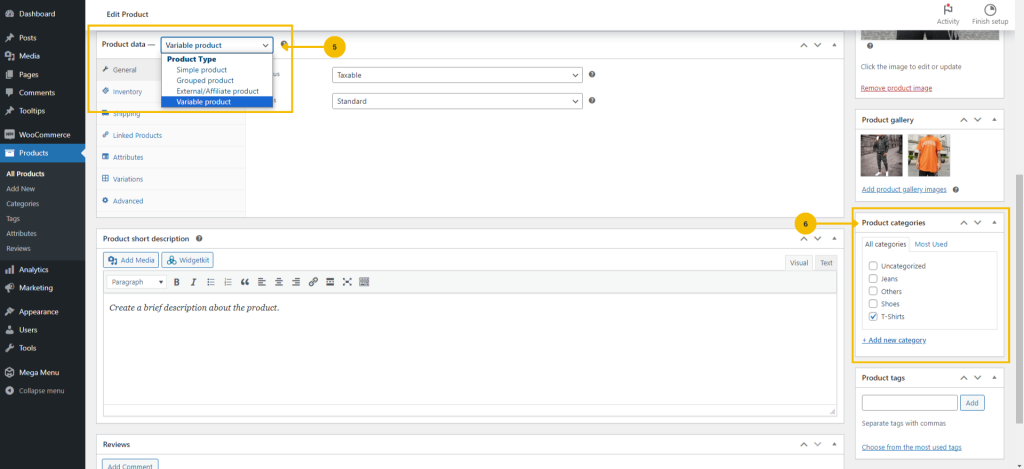
5. Click the drop-down menu and choose ‘Variable products’.
6. Choose a category for your products, and if you want to create a new one, click ‘Add new category’.

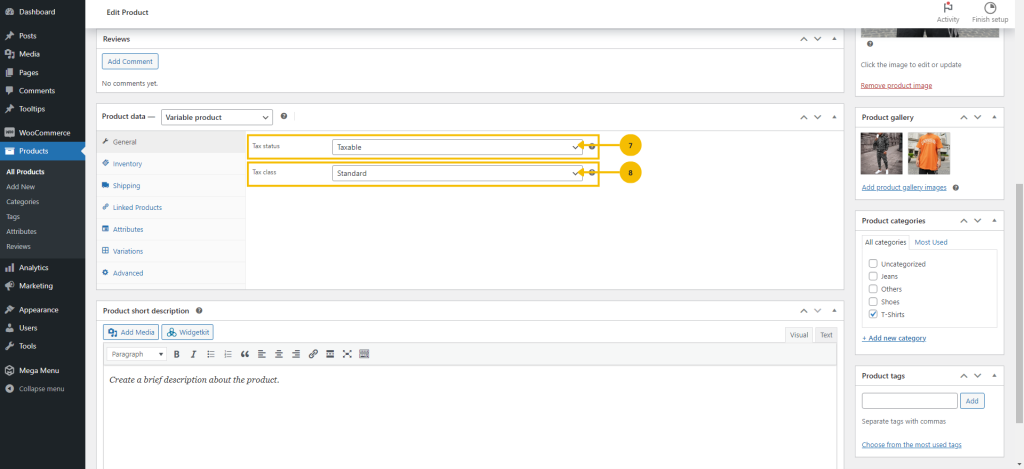
7. Click on the drop-down button and choose one of the options listed under ‘Tax status’.
8. Click on the drop-down button and select from the available choices under ‘Tax class’.

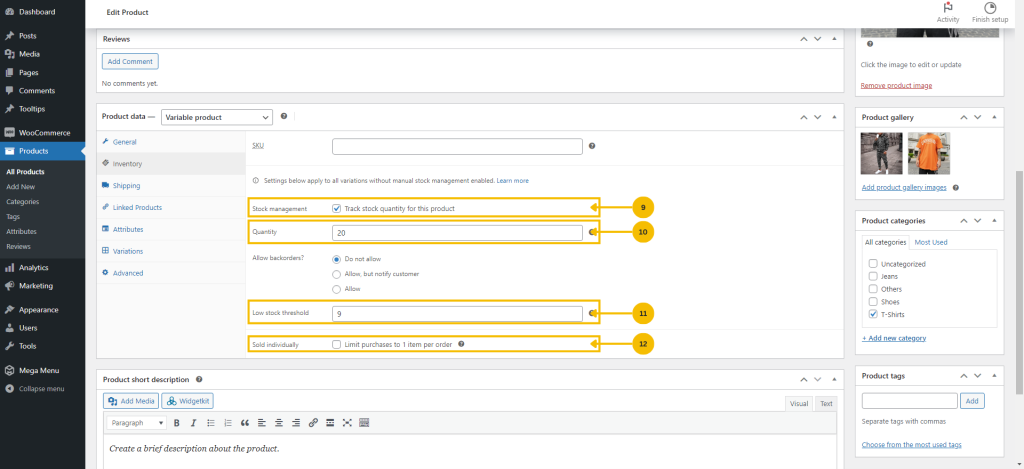
9. Manage your product’s stock by checking the box.
10. Enter the quantity available for your product.
11. Set a ‘Low stock threshold’ to get notified when your product is running low.
12. If you want to limit purchases to one item per order, check ‘Sold individually’.

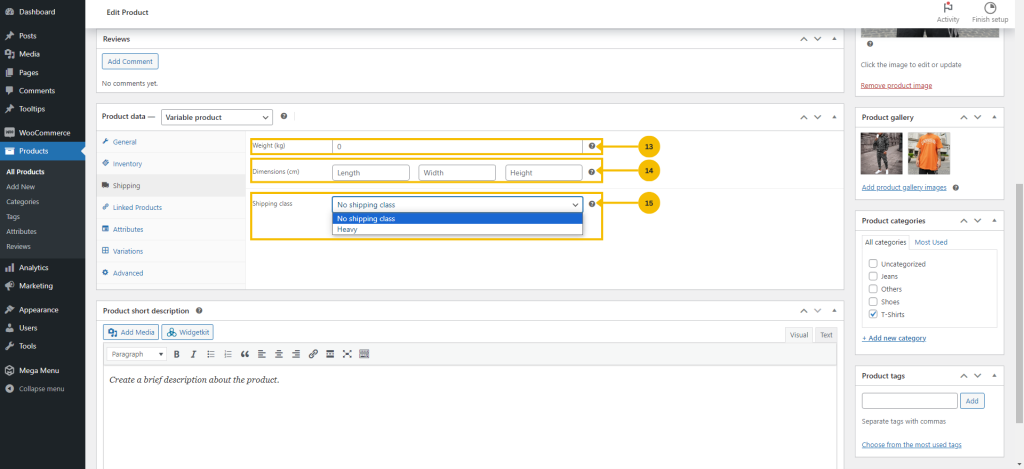
13. Specify your product’s weight to determine the appropriate shipping vehicle.
14. Enter your product’s dimensions if necessary.
15. You may also select a shipping class for your product.

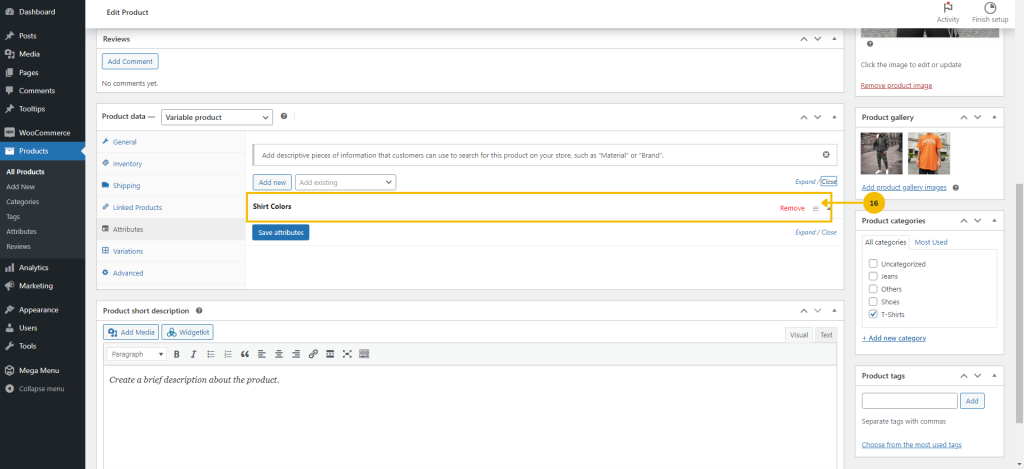
16. Click the ‘Shirt Colors’ attribute, the attribute name may vary depending on the attribute’s created name.

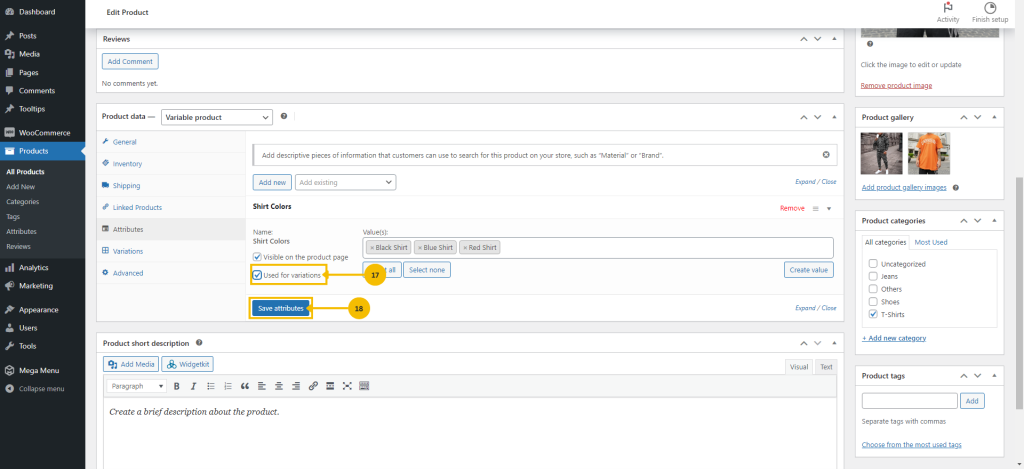
17. After selecting the shirt colors (or your custom attribute name), click on ‘Used for variations’.
18. Next, click the ‘Save attributes’ button.

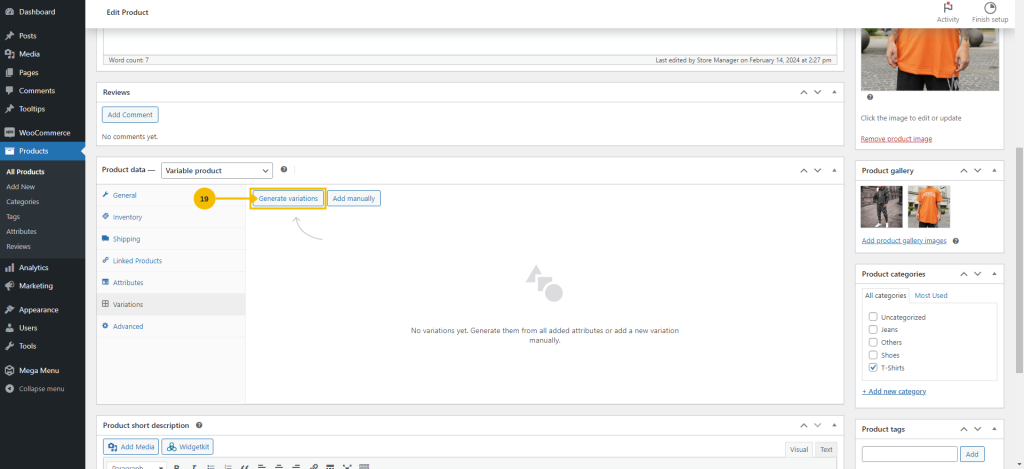
19. After saving the attributes, go to the ‘variations’ section, then click ‘Generate variation’ or add them manually.

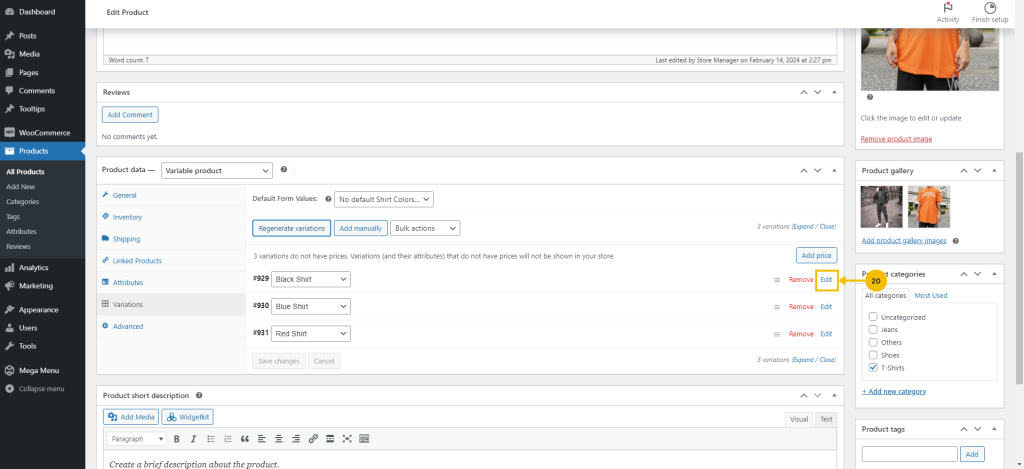
20. After clicking the generate variations, click the ‘edit‘ button.

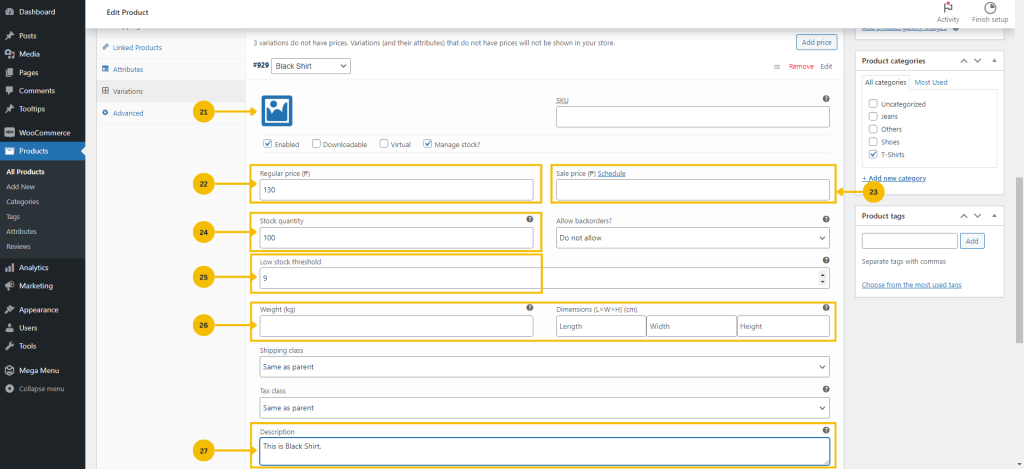
21. After selecting the edit button, you can now modify your variable product and upload the items you want to display in your online store.
22. Enter the ‘regular price’ of your variable product.
23. To put your product on sale, simply enter the ‘sale price’ and ‘set the schedule’ for the start and end dates of the sale price of your product.
24. Enter the quantity available for your product.
25. Set a ‘Low stock threshold’ to get notified when your product is running low.
26. Specify your product’s weight to determine the appropriate shipping vehicle, you can also indicate your product’s dimensions if necessary.
27. Create a short description for your variable product.

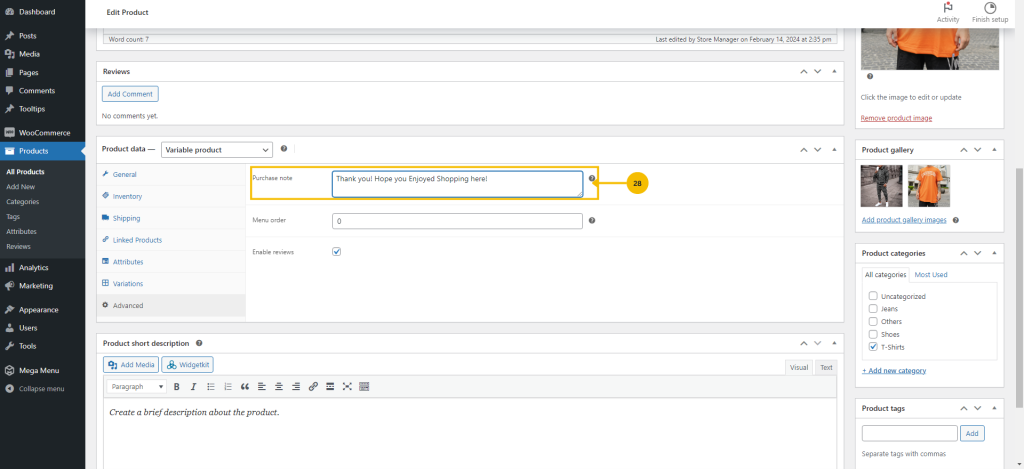
28. Create a ‘Purchase note’ for your customers after they have completed a purchase on your online store.

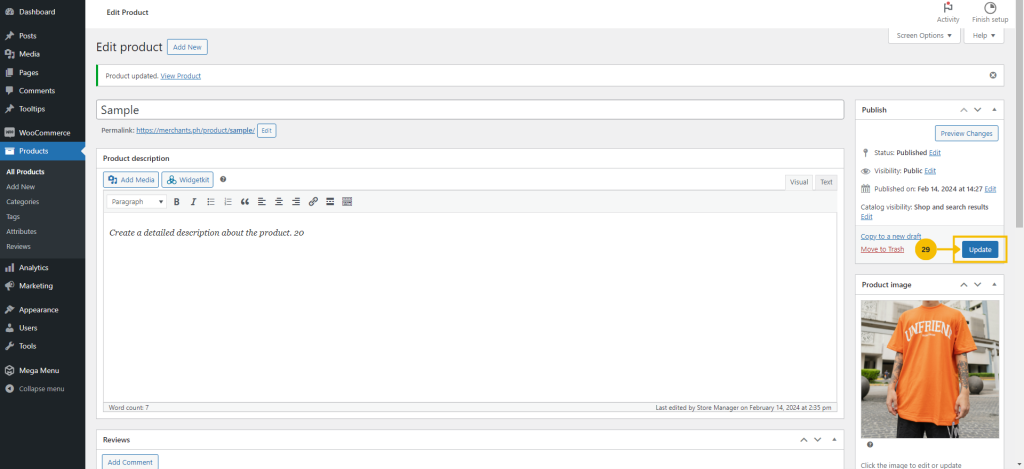
29. Click the ‘Publish’ button to display your variable product in your online store.

Read More

Setting up your Simple Product

Make your online store better with simple products. Just one size or color – easy choices for customers. It’s simple shopping, making it quick and stress-free for them to find what they want.

Read more: Manage User Profile

Before you begin

To set up your simple product, you must be:
• Store Manager of your online shop.
• Log in to your website with your store manager credentials.

Add simple product

Go to the navigation bar, then click on ‘Products’.

After selecting the products menu, click on ‘Create products’.

To be able to create a product, follow the steps below:

1. Enter the name of the product you want to sell.
2. Write a detailed description of the product.
3. Select the picture you like to get displayed in your online store.
4. Upload additional photos to the product gallery if you have any.

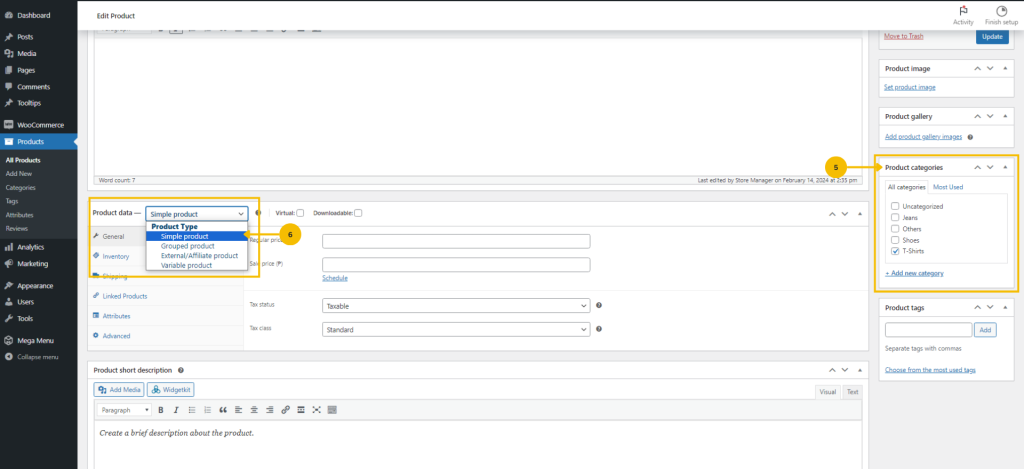
5. Choose a category for your products, and if you want to create a new one, click ‘Add new category’.
6. Click the drop-down menu and choose ‘Simple products’.

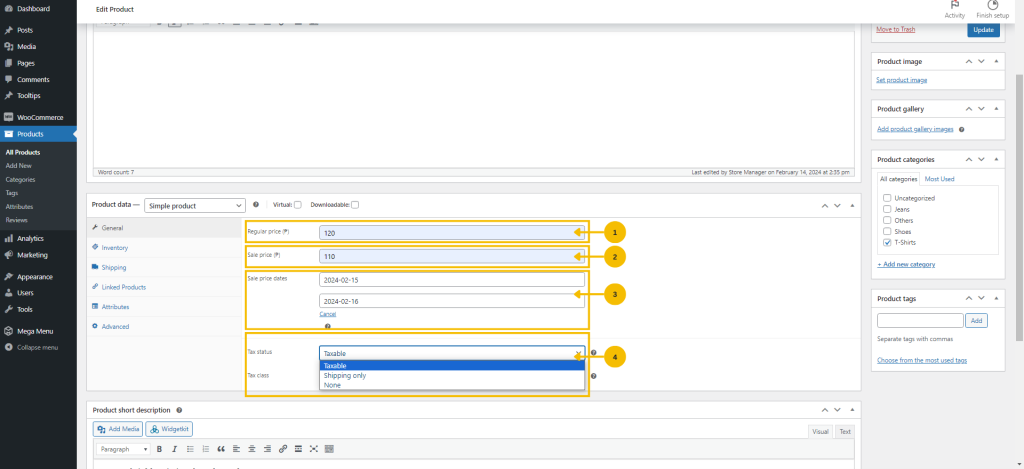
1. Enter the ‘Regular price’ of the product.
2. To put your product on sale, just enter the ‘Sale price’ in the designated section.
3. Set the ‘Sale price dates’ of the product by choosing the start and end dates.
4. Select from the available options by clicking on the drop-down button in ‘Tax class’.

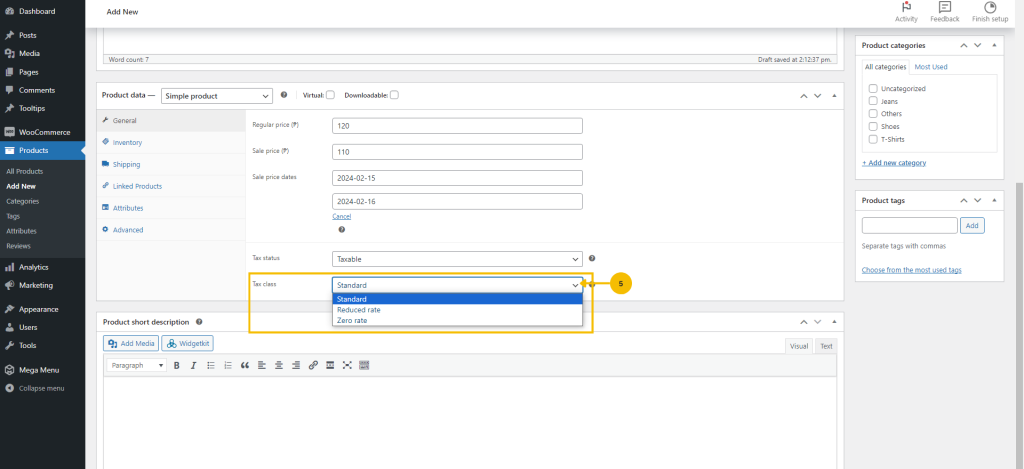
5. Select from the available options by clicking on the drop-down button in ‘Tax class’

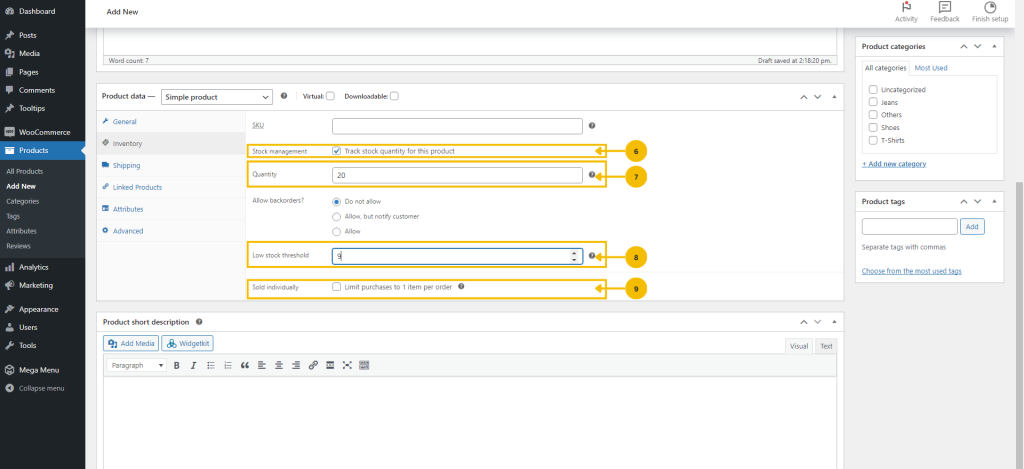
6. Manage your product’s stock by checking the box.
7. Enter the quantity available for your product.
8. Set a ‘Low stock threshold’ to get notified when your product is running low.
9. If you want to limit purchases to one item per order, check ‘Sold individually’.

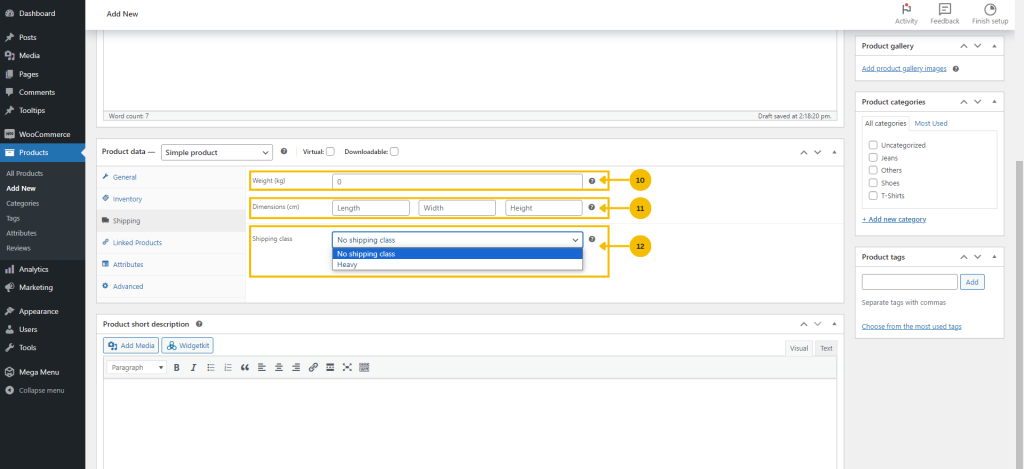
10. Specify your product’s weight to determine the appropriate shipping vehicle.
11. Enter your product’s dimensions if necessary.
12. You may also select a shipping class for your product.

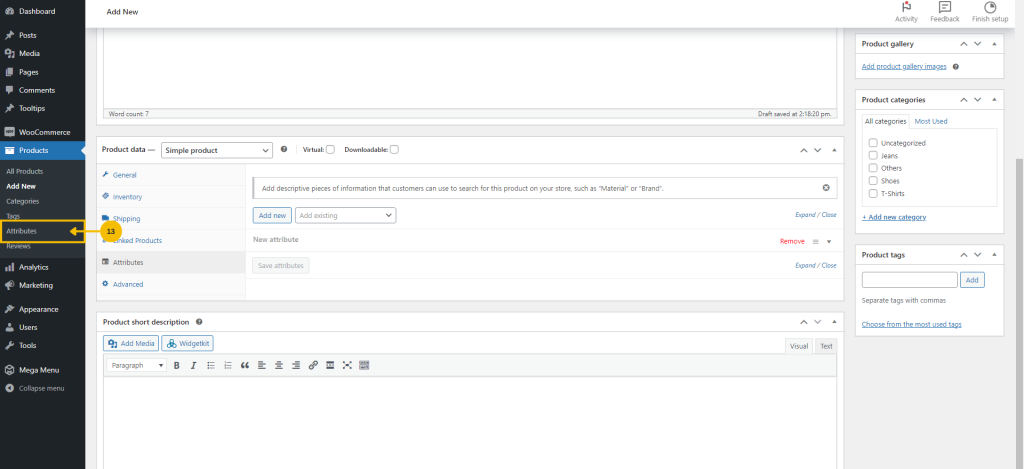
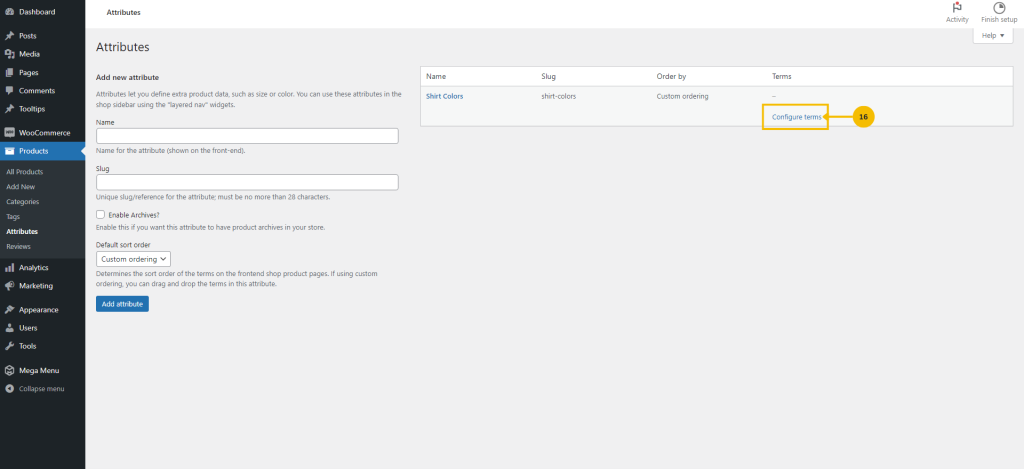
13. If you want to add attributes in your product, go to the menu bar and choose ‘Attributes’ under the product’s menu.

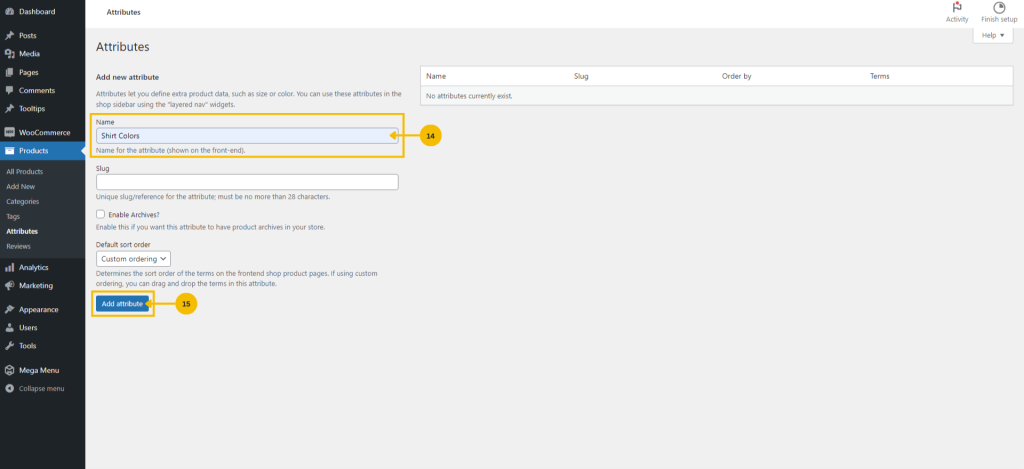
14. After selecting attributes, enter a name of your product’s attribute.
15. Click the ‘Add attribute’ button.

16. Click the ‘Configure terms’.

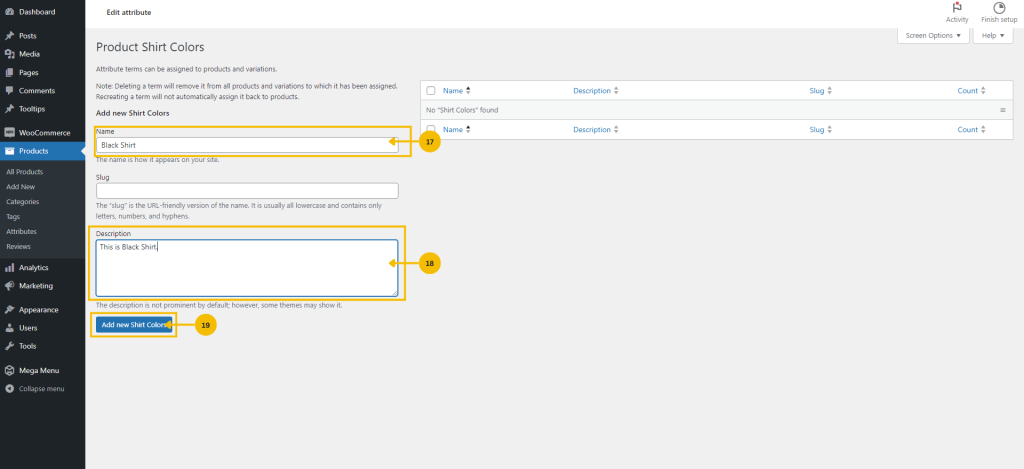
17. Enter a name for your attribute.
18. Provide a description for your attribute.
19. Select the ‘Add new shirt colors’ button (Note: the button’s name may vary depending on the created attribute’s name).

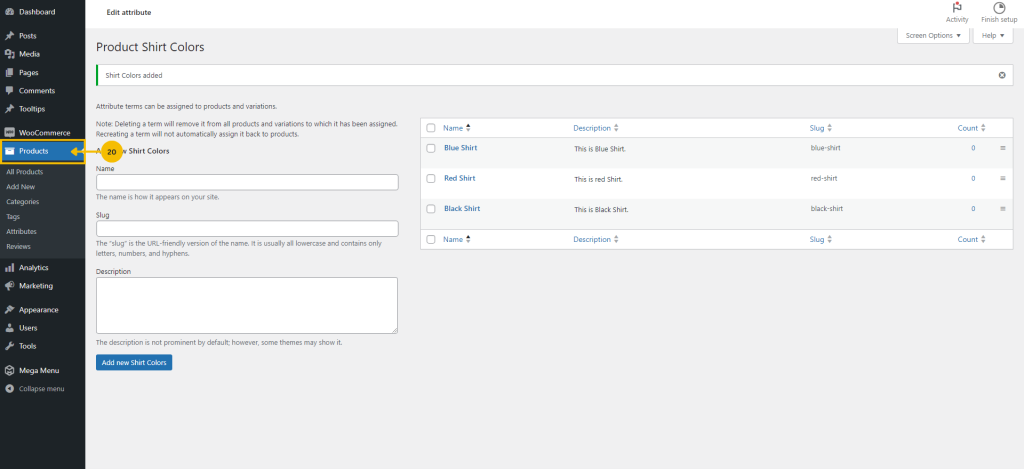
20. Once you’ve added your attributes, go back to the ‘Products’ menu.

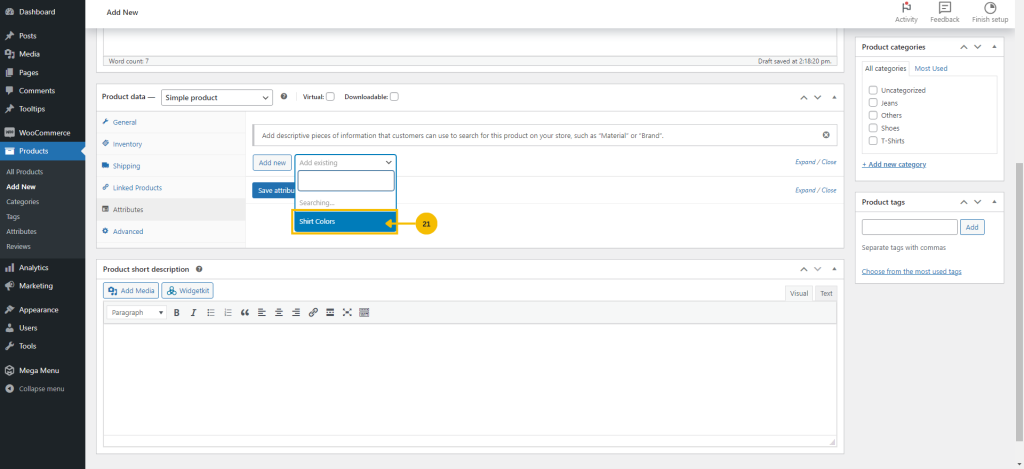
21. Choose the name of the attributes you’ve created.

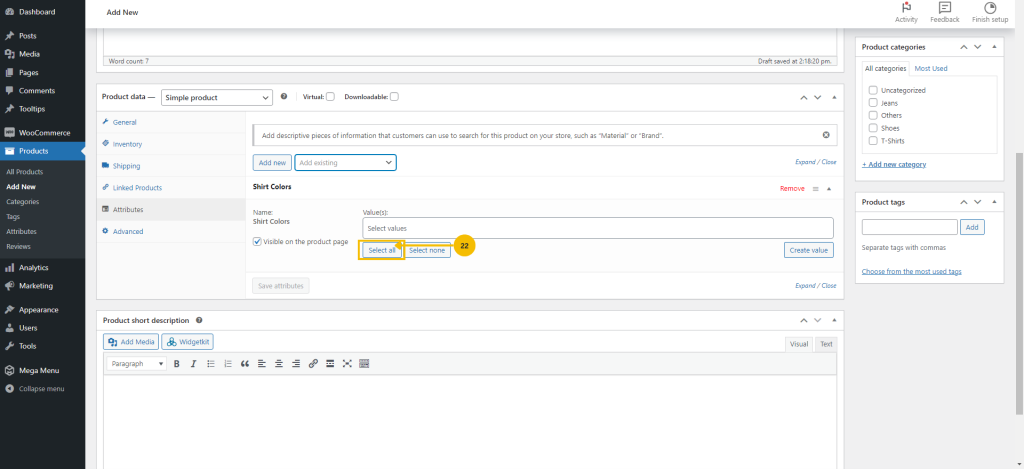
22. Click the ‘Select all’ button.

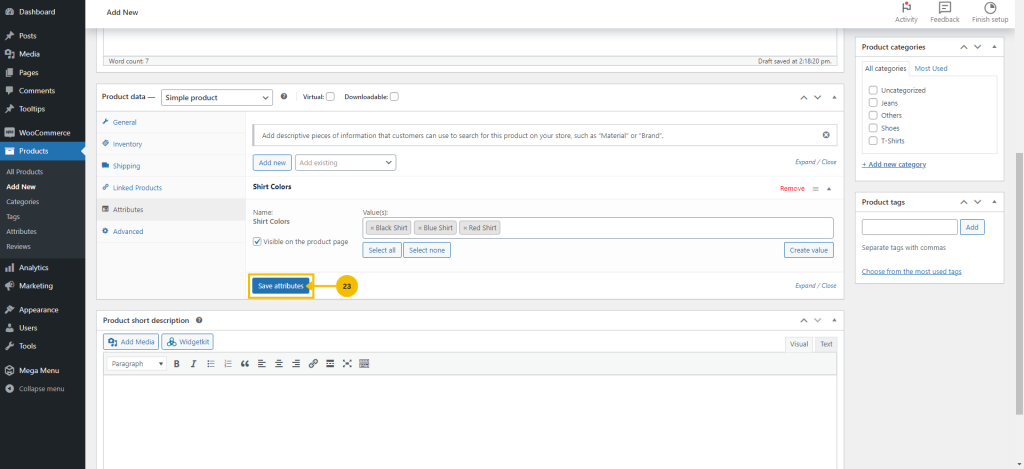
23. Once you have clicked the select all button, click the ‘Save attributes’.

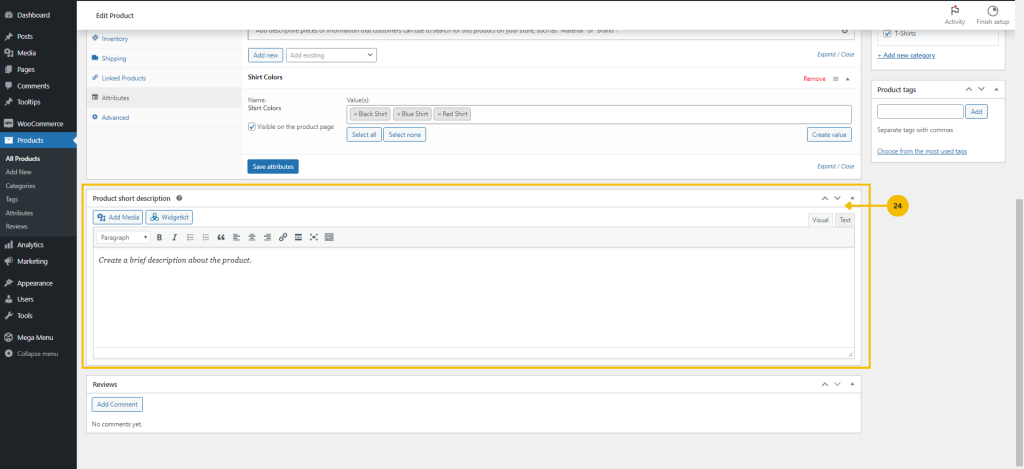
24. Create a brief and captivating overview of your product.

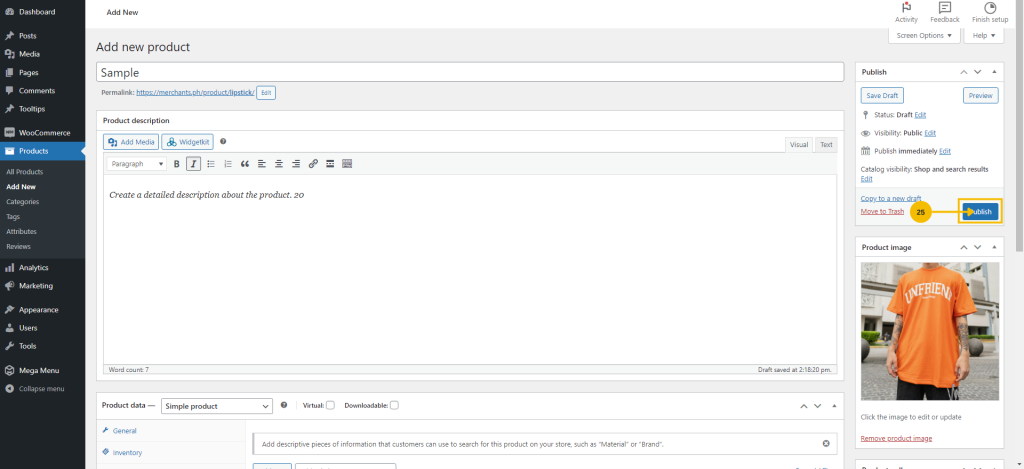
25. Once you’ve finished setting up your product, press the ‘Publish’ button.
Read More